Docker Laboratory

Hands on the Docker platform using different Scenarios.
This post goes through a set of exercises and tasks regarding the Docker platform. The goal is getting familiar with Docker and with the most frequently commands of the Docker CLI. This post requires a basic knowledge of Docker. You can refer to this other post for an introduction to Docker. All the material used in this post is freely available at my Github repository.
Running a container Permalink
Let's start launching a fully functional WordPress blog engine using a Linux-based Docker container, so that we can learn the commands needed to pull a container image and then launch the container using the Docker CLI.
Type the command docker pull tutum/wordpress to connect to the public Docker Registry and download the latest version of the WordPress container image published by tutum (hence the format tutum/wordpress). The image will be pulled from the registry layer by layer.
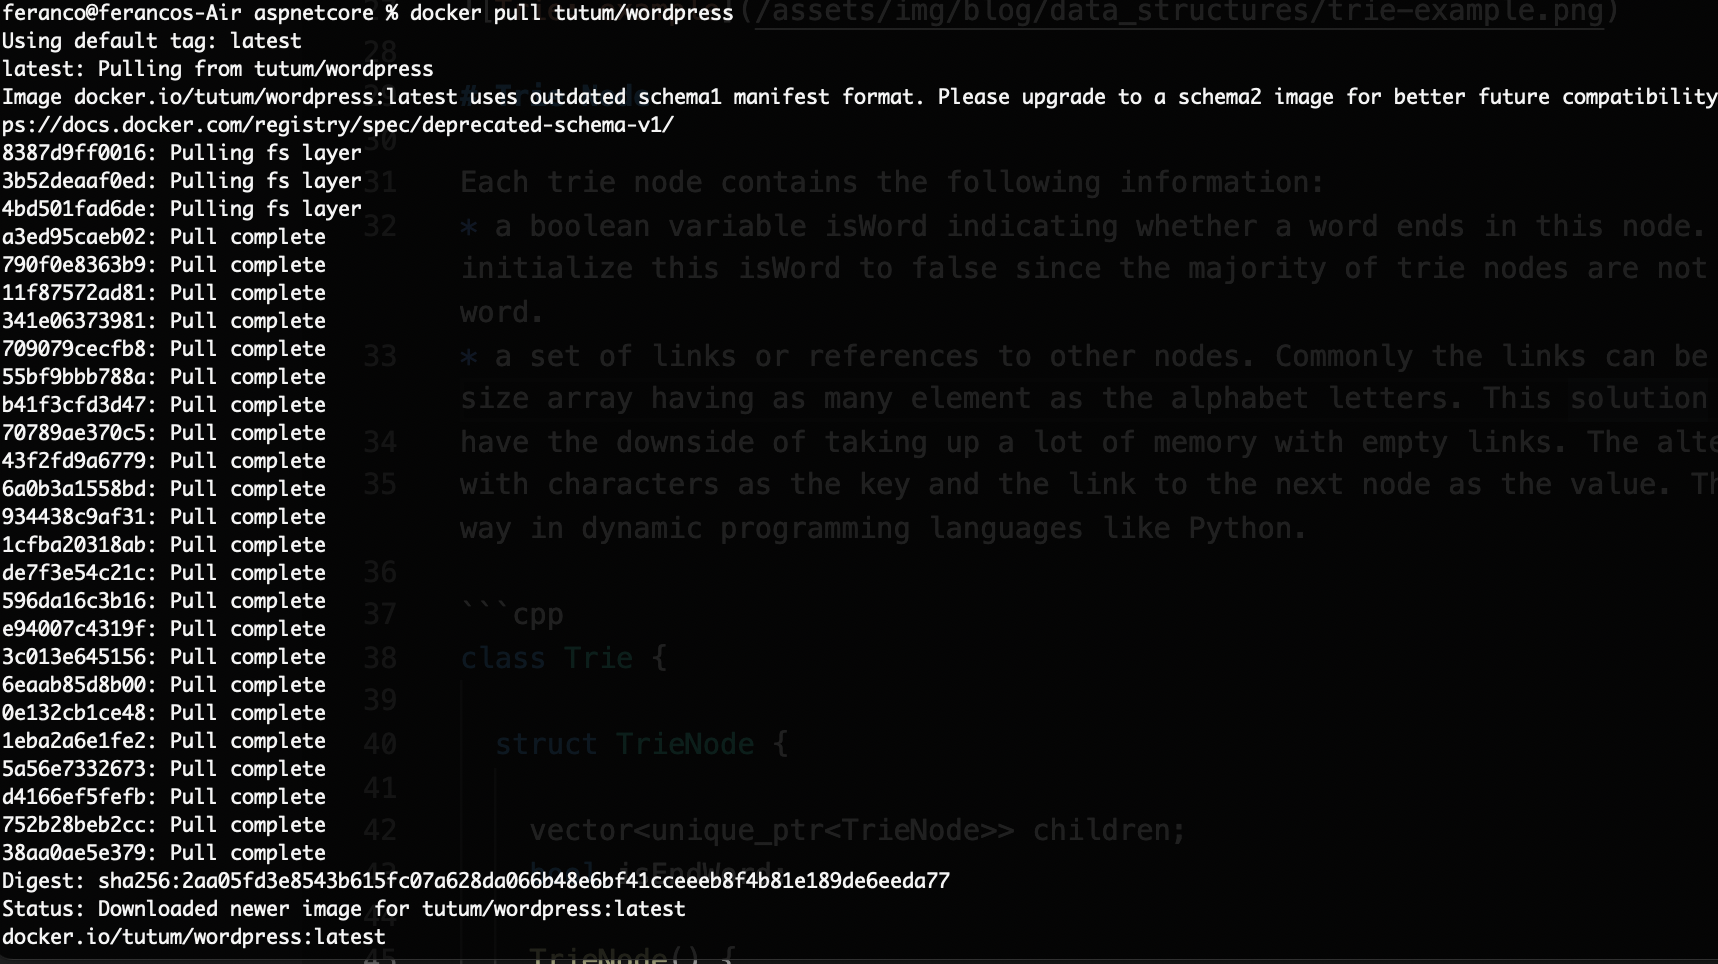
Type the command docker run -d -p 80:80 tutum/wordpress The option -p is used to map the port 80 of the container (second port) to the port 80 of the docker host (first 80). So if we want to run multiple Wordpress images as separated containers we need to map the other containers port to different host ports (i.e. docker run -d -p 8080:80 tutum/wordpress ). The -d option tells Docker to detach and run the container in the background. We can also run a container with a name, using the –name option (i.e. docker run –name mywordpress -d -p 8081:80 tutum/wordpress). If we don't do this a random name is assigned.
Use the command docker ps to visualize running containers.

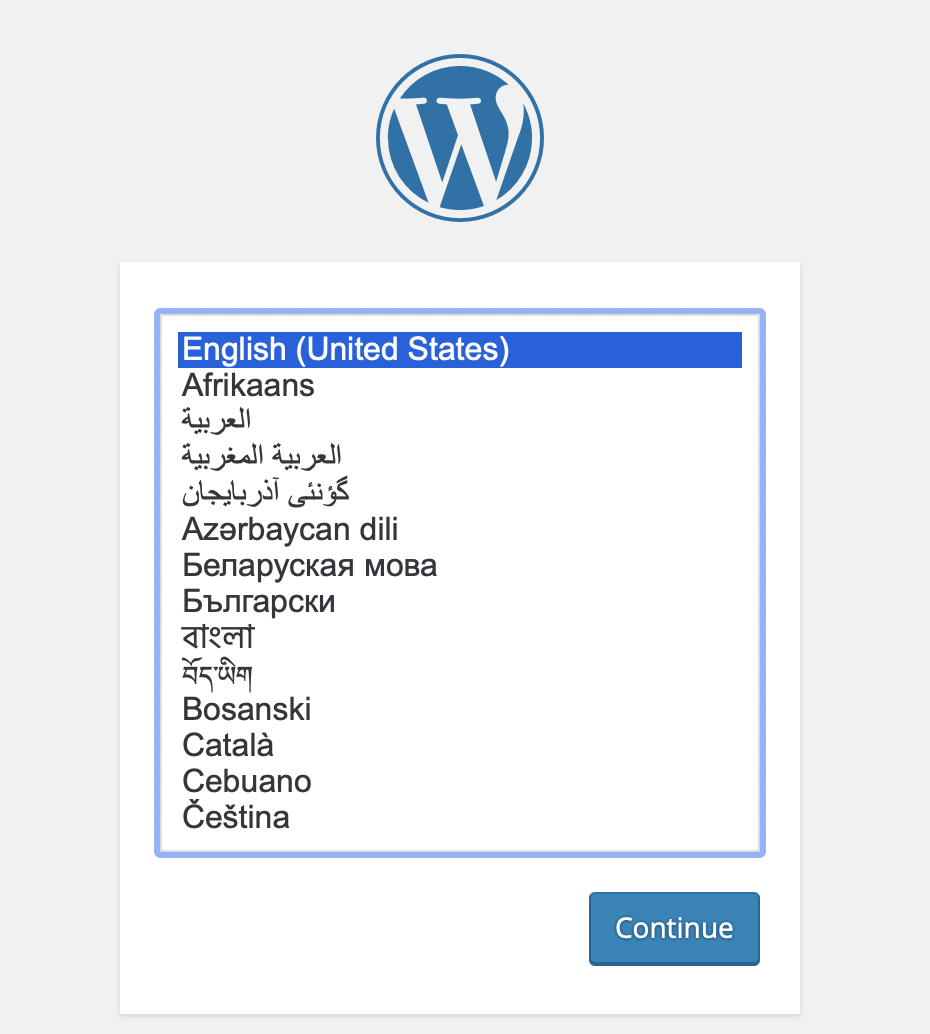
Open a browser and navigate to the URLs localhost:80 and localhost:8080 to verify that the WordPress blog instances are actually running.
Working with the Docker Command Line Interface (CLI) Permalink
Let's now use some common Docker commands needed to work with containers.
We can stop a running container by using the docker stop CONTAINER_ID command. Here CONTAINER_ID is the identifier of a running container. We can usually just use the first couple characters to identify the container ID. We can then use again the docker ps command and notice how the listing shows one less container running. The -a option allows to show all containers, even those that are stopped.


We can also issue a command to start the container which was stopped: docker start CONTAINER_ID. We can then check that container has started successfully running again the docker ps command.

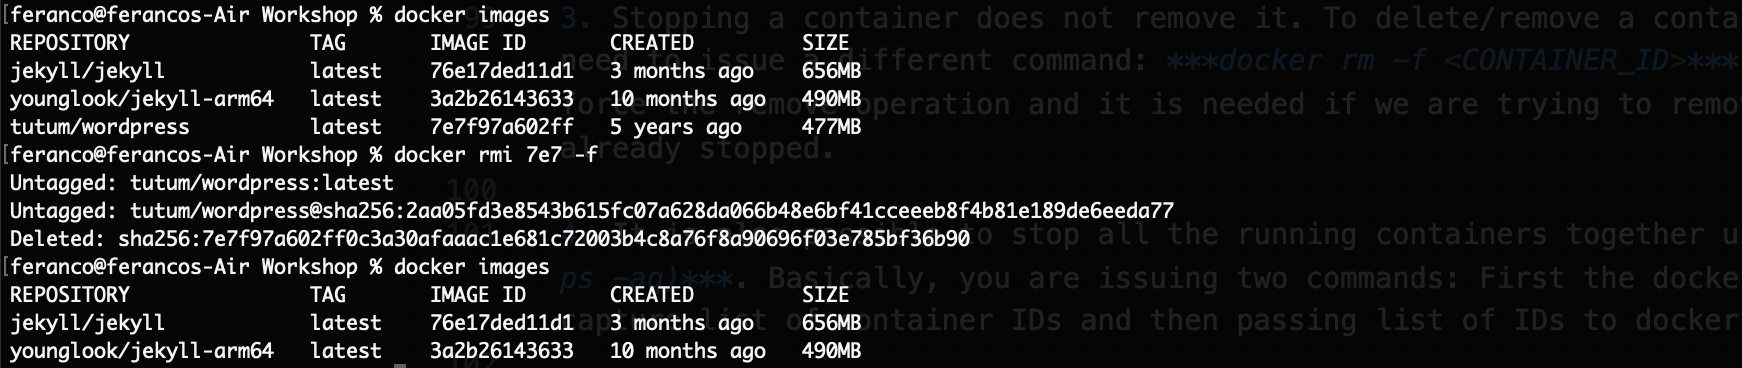
Stopping a container does not remove it. To delete/remove a container and free the resources we need a different command: docker rm -f CONTAINER_ID. The -f option is used to force the remove operation and it is needed if we are trying to remove a container that is not already stopped.

It is also possible to stop all the running containers together using docker stop $(docker ps -aq). Here we are issuing two commands: first we use the docker ps with relevant options to capture the list of container IDs and then we pass this list of IDs to the docker stop command.

Removing a container does not remove the underlying image but only the specific container that was based on the image. To remove the image and reclaim its resources, like disk space, we need to issue a different command: docker rmi IMAGE_ID -f. The -f is to force the removal. We cannot remove an image associated with a stopped (but not removed) container unless we use the -f parameter. To retrieve the image ids we can use the command docker images.
Building and Running Custom Container Images with Dockerfile Permalink
A Dockerfile is essentially a plain text file with Docker commands in it. We can think of it as a configuration file with a set of instructions needed to assemble a new Docker image. Here we will try to build and run ASP.NET Core 3.x Application Inside A Container. All the necessary files are available in my github repo.
Inspect the Dockerfile to understand which instructions will be executed. Multistage Dockerfile…
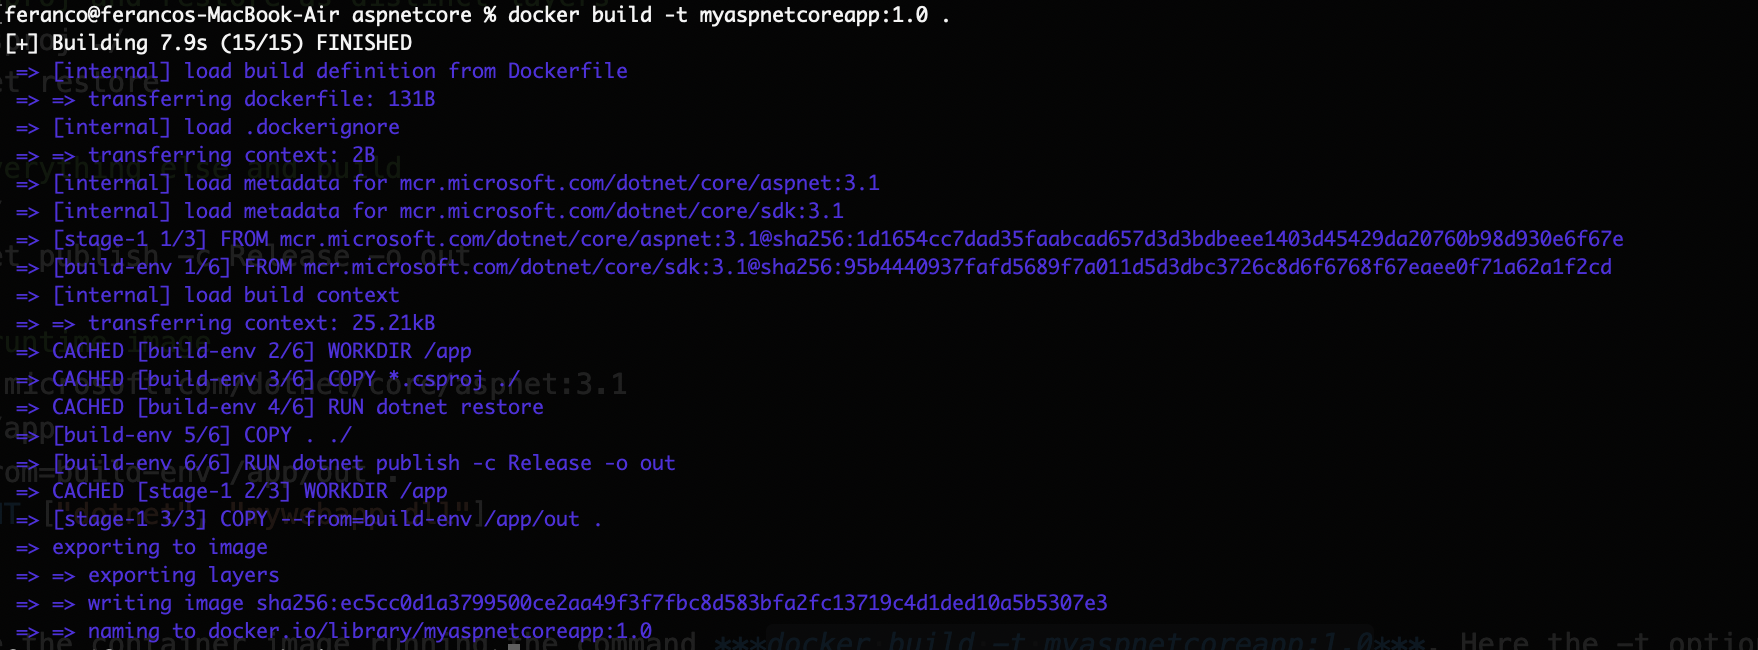
FROM mcr.microsoft.com/dotnet/core/sdk:3.1 AS build-env
WORKDIR /app

# Copy csproj and restore as distinct layers
COPY *.csproj ./
RUN dotnet restore

# Copy everything else and build
COPY . ./
RUN dotnet publish -c Release -o out

# Build runtime image
FROM mcr.microsoft.com/dotnet/core/aspnet:3.1
WORKDIR /app
COPY --from=build-env /app/out .
ENTRYPOINT ["dotnet", "mywebapp.dll"]
Create the container image running the command docker build -t myaspnetcoreapp:1.0 .. Here the -t option assign the 1.0 tag the new image to indicate its version. The final dot is also important and means to use the Dockerfile in the local directory.
Launch the container to run our application using the command docker run -d -p 8090:80 myaspnetcoreapp:1.0. We are now running our ASP.NET Core application inside the container listening at port 80 which is mapped to the port 8090 on the host.

Open a browser and test the application using the address localhost:8090.

Interact with a running container Permalink
In some situations we need to interact with a running container for the purposes of troubleshooting, monitoring etc.
We can establish an interactive session a with a running container using its CONTAINER ID or NAME with the command docker exec -it CONTAINER_ID_OR_NAME bash
A new interactive session is now establish to a running container. Since "bash" is the program that was asked to be executed you now have access to full bash shell inside the container. We can run a command "ls" to view the listing of files and directories. Notice it has all the files copied by Dockerfile command in previous section.

Making Changes to a Running Container Permalink
While we are interacting and running commands inside a running container, we may also want to make changes/updates to it and create a brand-new image out of these changes.
Establish an interactive session with our aspnetcore container as showed in the previous section.
Run the command and then apt-get update and then apt-get install nano to install the nano text editor inside the running container.
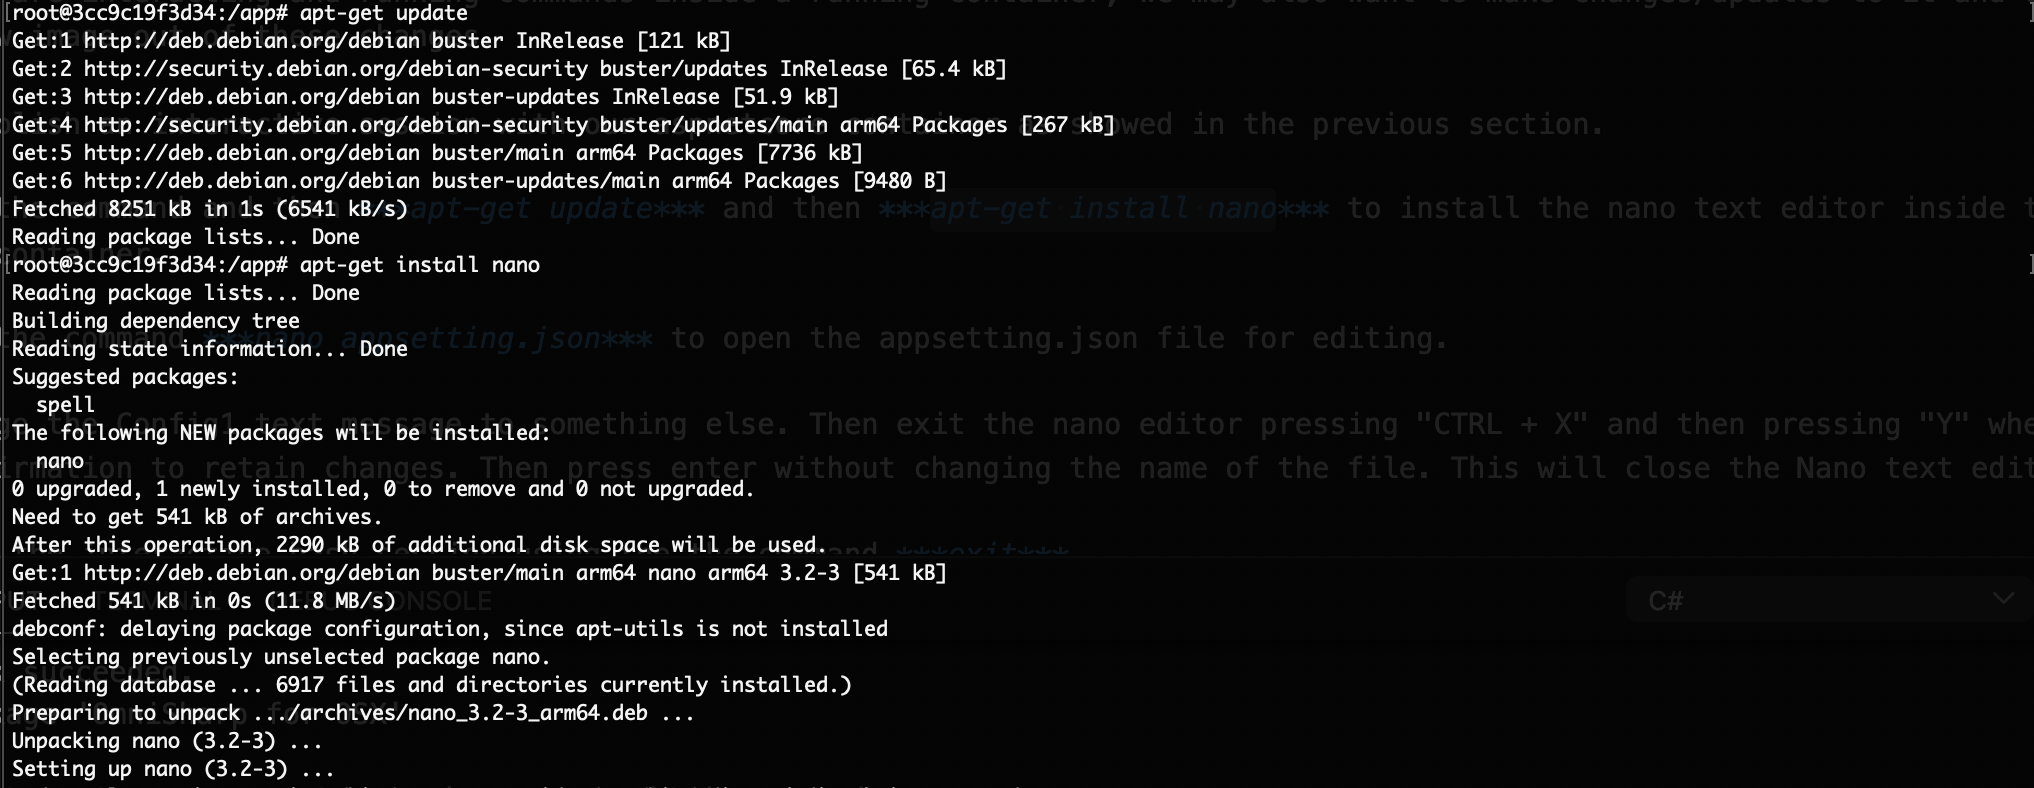
Run the command nano appsetting.json to open the appsetting.json file for editing.
Change the Config1 text message to something else. Then exit the nano editor pressing "CTRL + X" and then pressing "Y" when asked for confirmation to retain changes. Then press enter without changing the name of the file. This will close the Nano text editor.
Exit the interactive bash session using the the command exit

The running container needs to be stopped first and then started again to reflect the changes. So stop the running container and start it again as we already did in the previous sections.
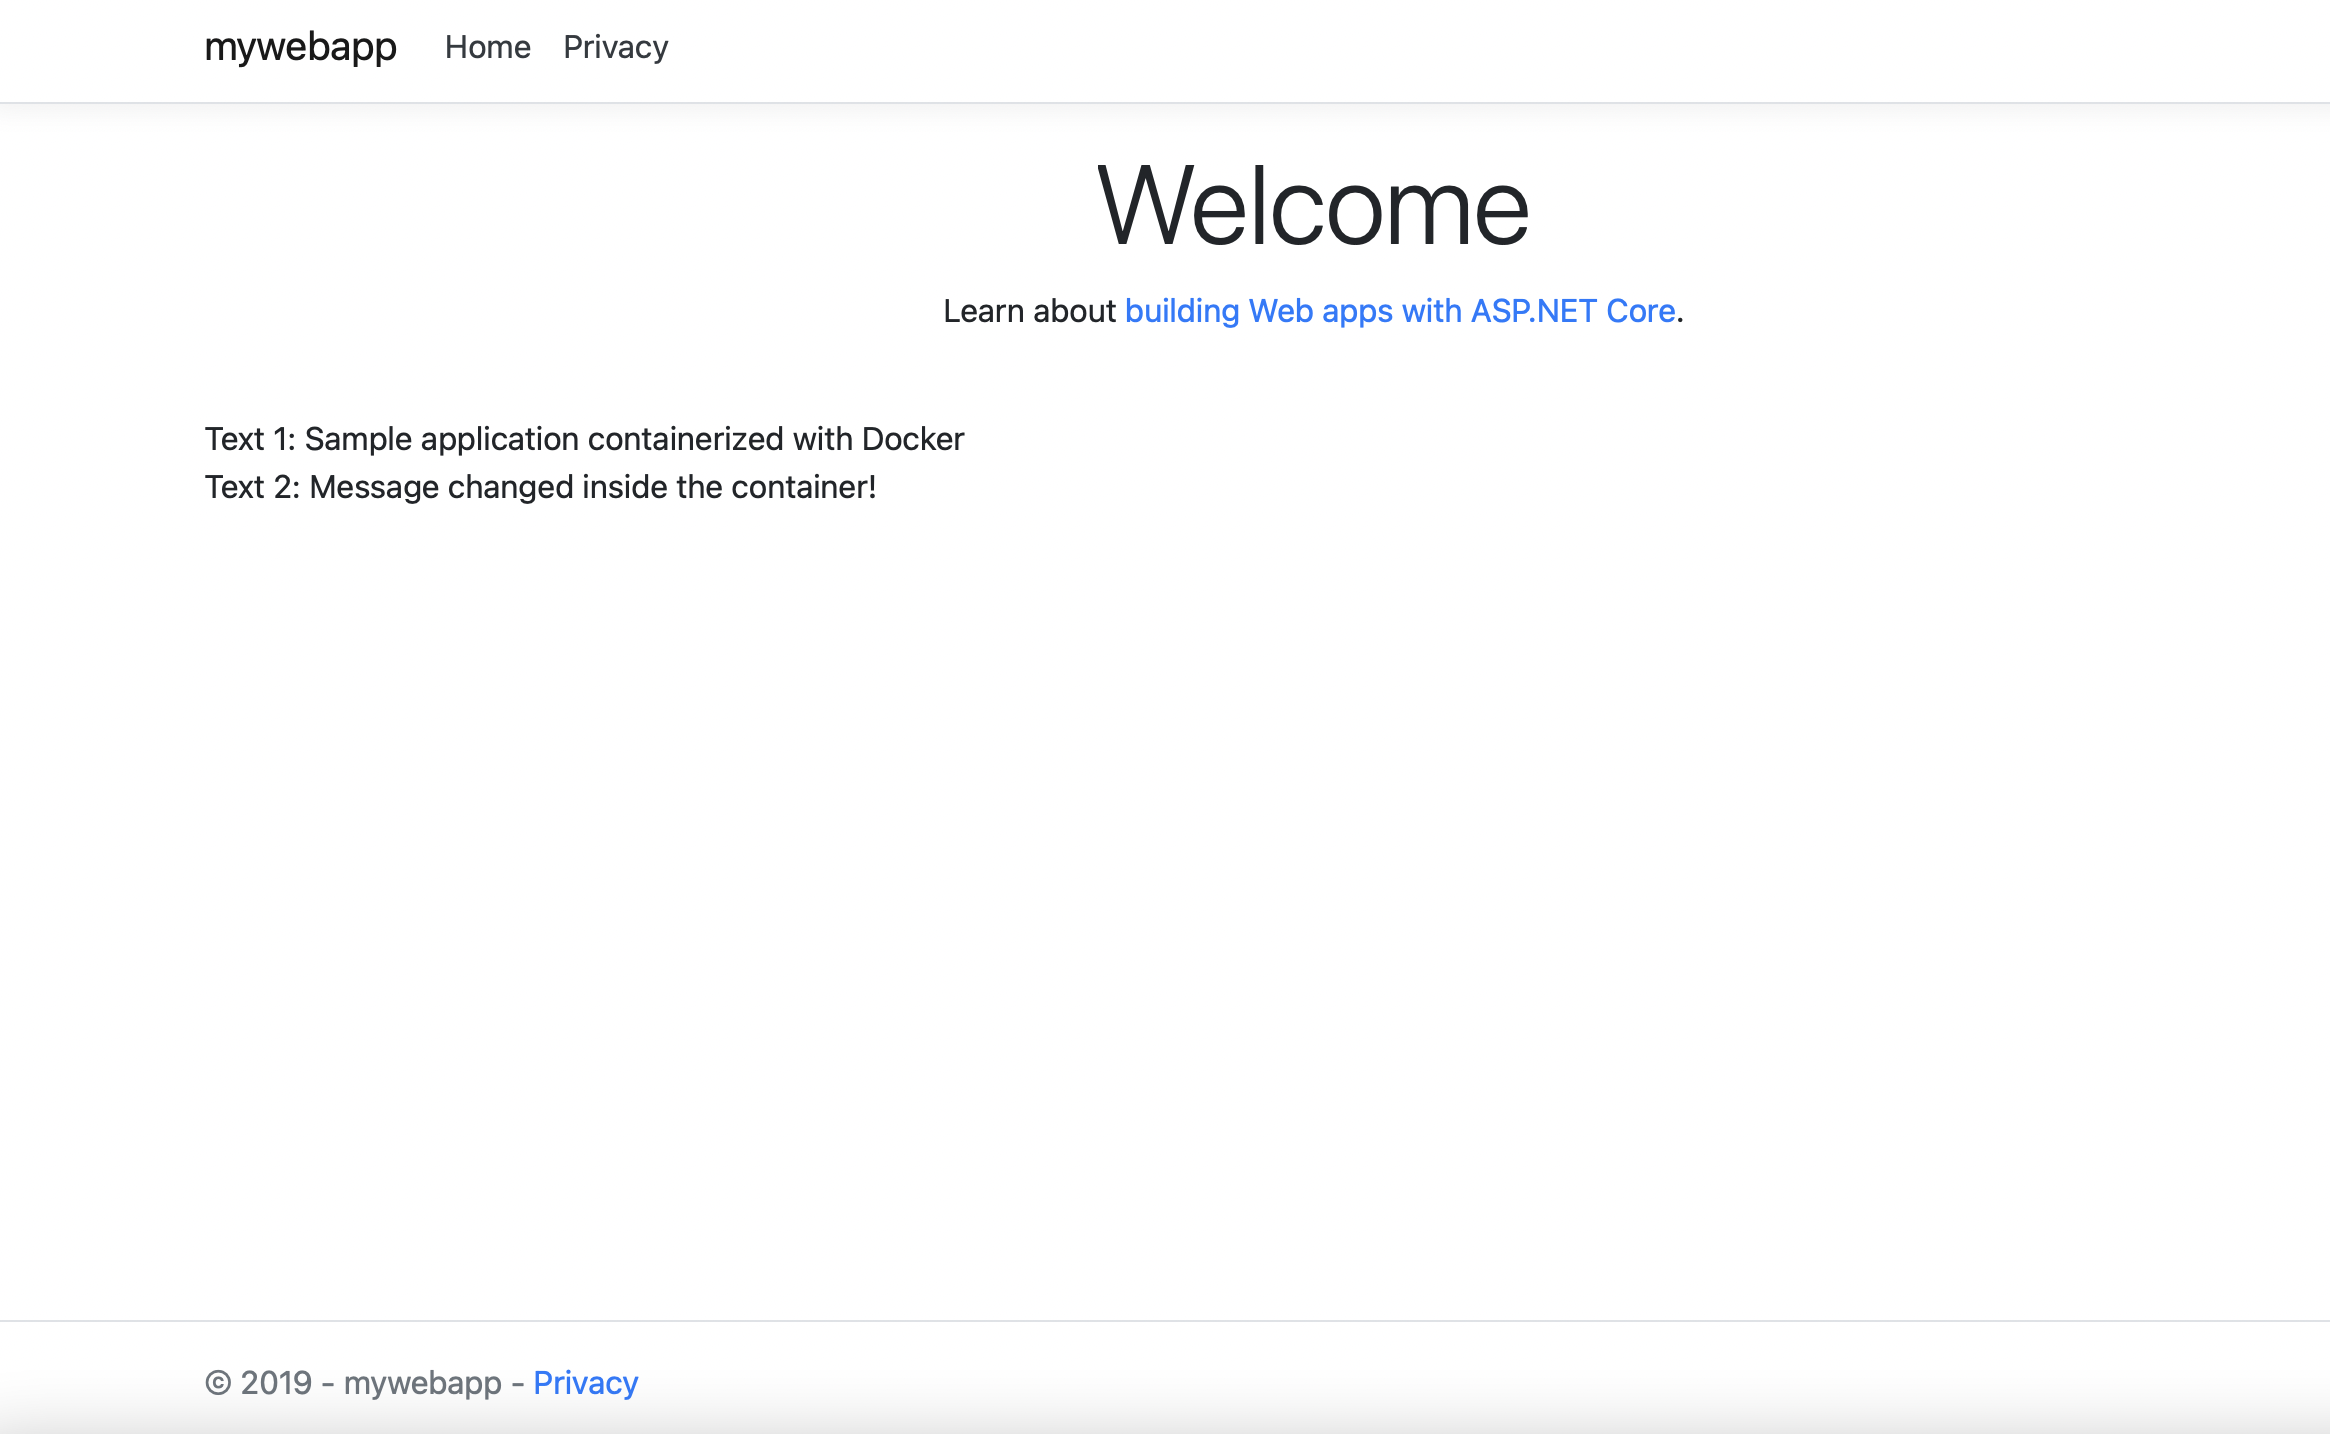
Verify that the changes to the container were persisted opening a browser and typing the address localhost:8080.
Persist Changes to a new Image Permalink
The changes we made in the previous section are only available to that container and if we were to remove the container, these changes would be lost. One way to address this is by creating a new container image based on running container that has the changes. This way the changes will be available as part of a new container image. Even if this is helpful during development/test phases, where rapid development and testing requires a quick turn-around time. this approach is generally not recommended because it is hard to manage and scale at the production level.
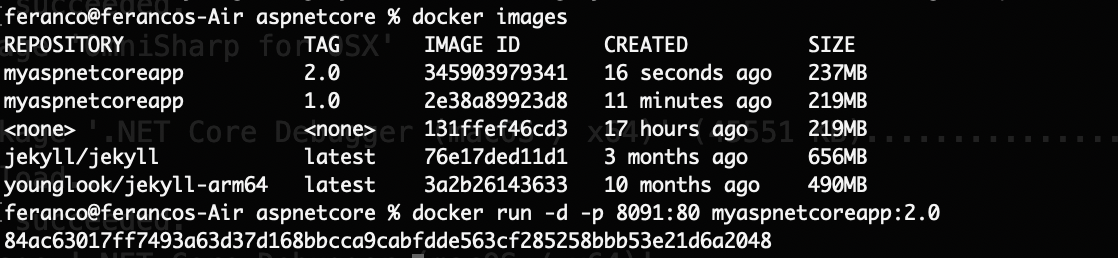
Create a new image running the command docker commit CONTAINER_ID myaspnetcoreapp:2.0. Here the docker commit command is used to create a new image from a container's changes.
View the list of all container images to check that the new image is available and then run the new image to test it. After opening a browser we should see agsin the updated message displayed.

Working with multiple containers Permalink
Working with multiple containers interacting together is very common scenario. So let's try this out using a web application that runs in a container and talks to a database hosted in another container. We will use an Azure SQL Server instance as database and an ASP .NET Core Application as web application.
Inspect the Dockerfile describing how to package the database. The entrypoint is the script entrypoint.sh which will start the database server and run import-data.sh. The import-data.sh script will then wait for the server to start and will trigger the database creation, the data import and the ping command to keep the database alive. The SQL commands necessary to create a database are defined in the setup.sql file, while the Users.csv file contains the test data.
FROM mcr.microsoft.com/azure-sql-edge:latest

# Create db directory
RUN mkdir -p /usr/src/db
WORKDIR /usr/src/db

# Install ping that will be used to keep the container up
RUN apt-get update && apt-get install -y iputils-ping

COPY . .

# Grant permissions for the import-data and entrypoint scripts to be executable
RUN chmod +x /usr/src/db/import-data.sh
RUN chmod +x /usr/src/db/entrypoint.sh

CMD ./entrypoint.sh
Run the command to build our Azure SQL Server container image docker build -t myazuresqlserver ..

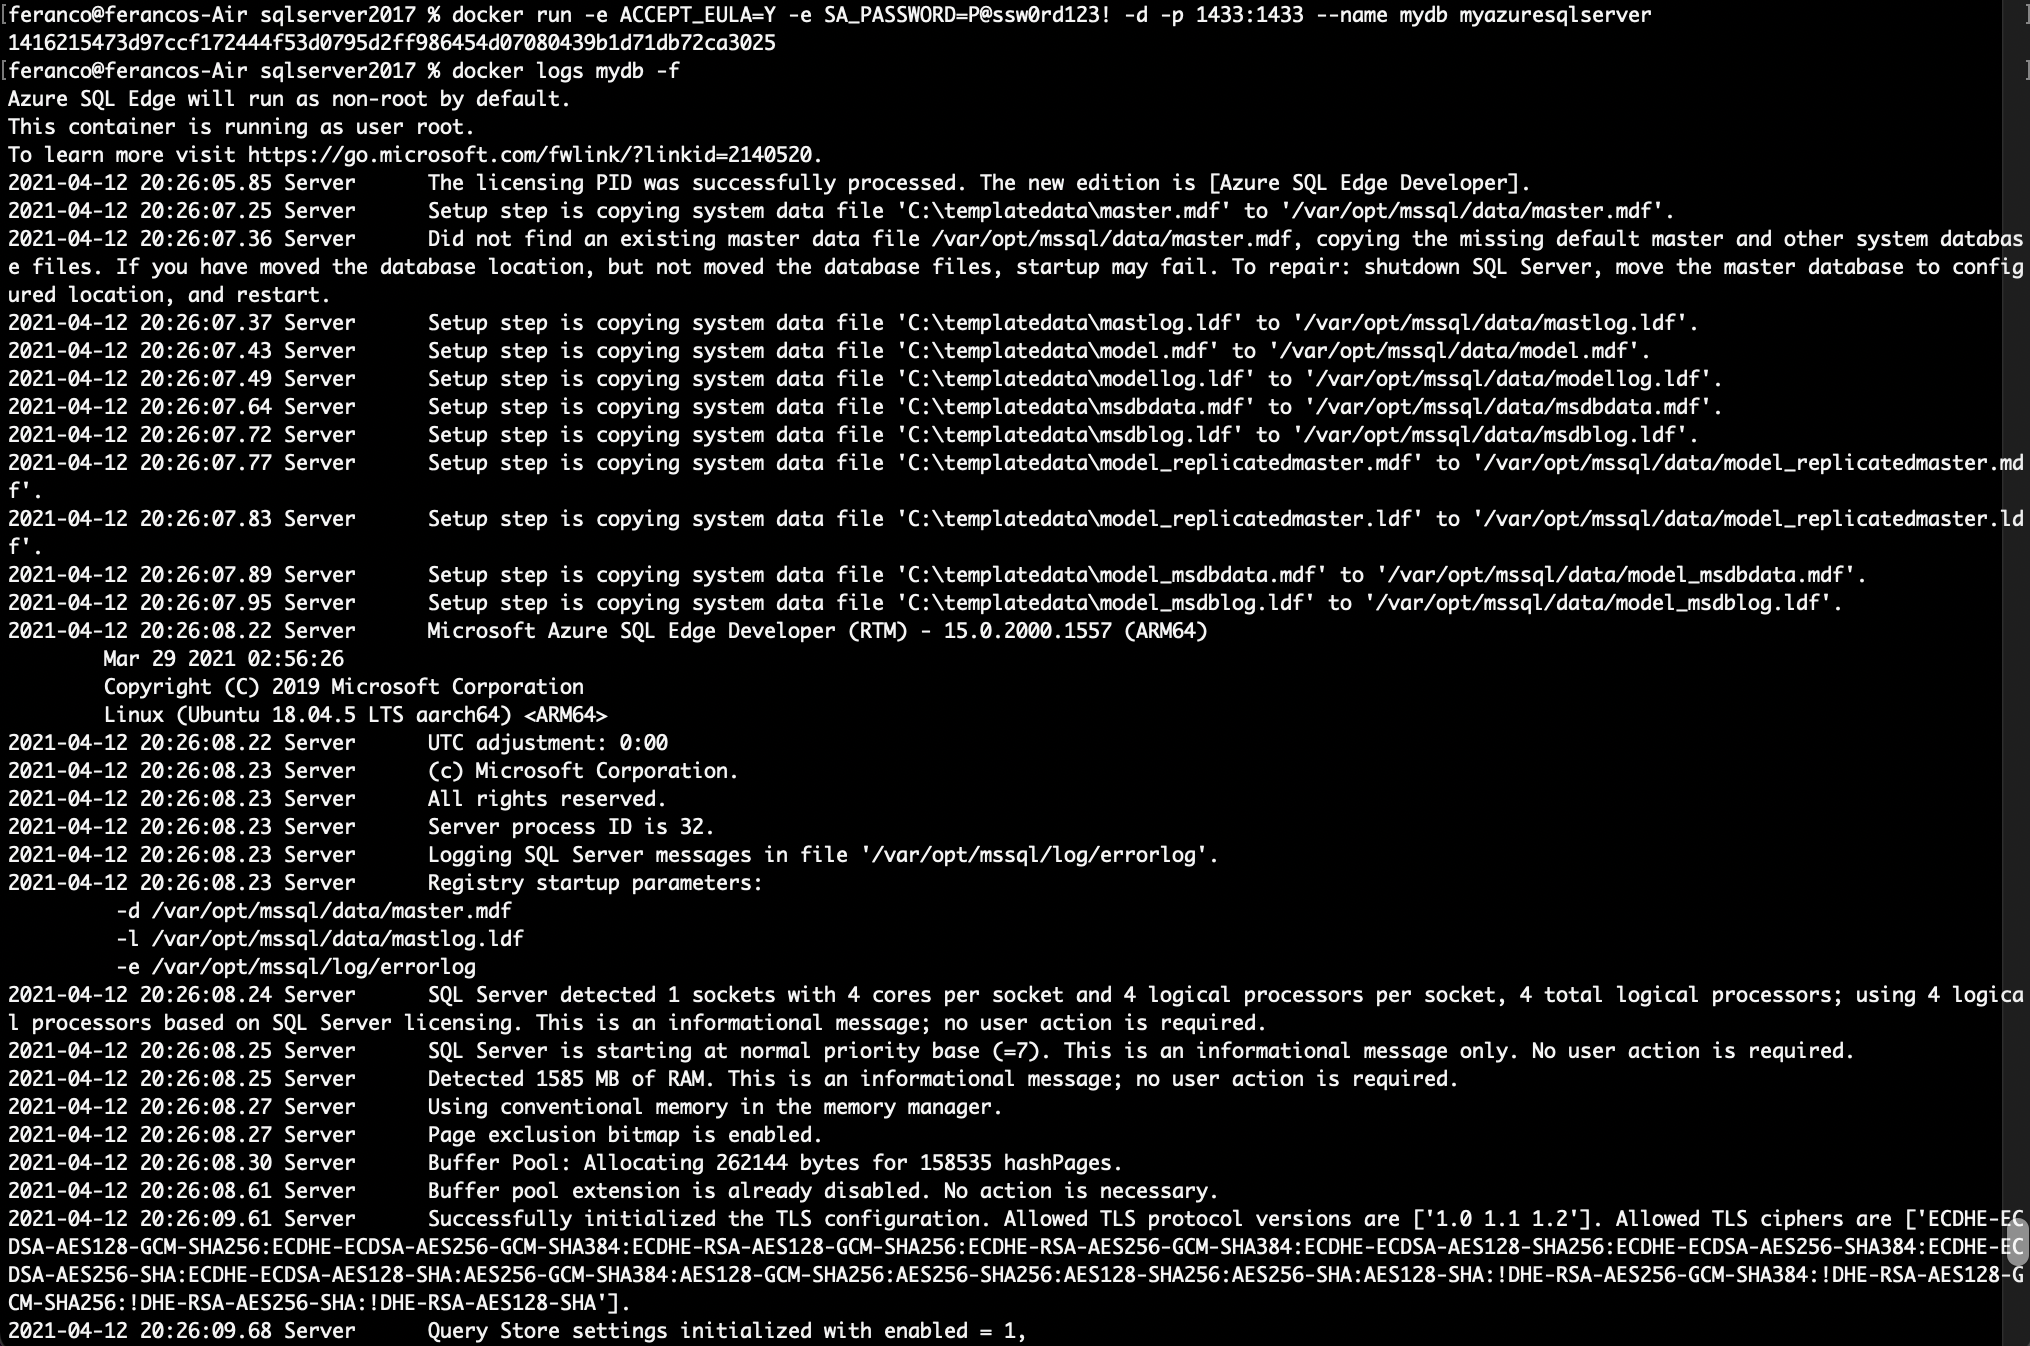
Run the container with the command docker run -e ACCEPT_EULA=Y -e SA_PASSWORD=P@ssw0rd123! -d -p 1433:1433 –name mydb myazuresqlserver. This command takes some environment variables passed with the -e option. The ACCEPT_EULA variable confirms our acceptance of the End-User Licensing Agreement, the SA_PASSWORD variable is the password used to connect to Azure SQL server once the container is running. We can follow the database initialization with the command docker logs mydb -f until we see the ping command starting. Once it started, we can interrupt the logs by pressing CTRL + C.
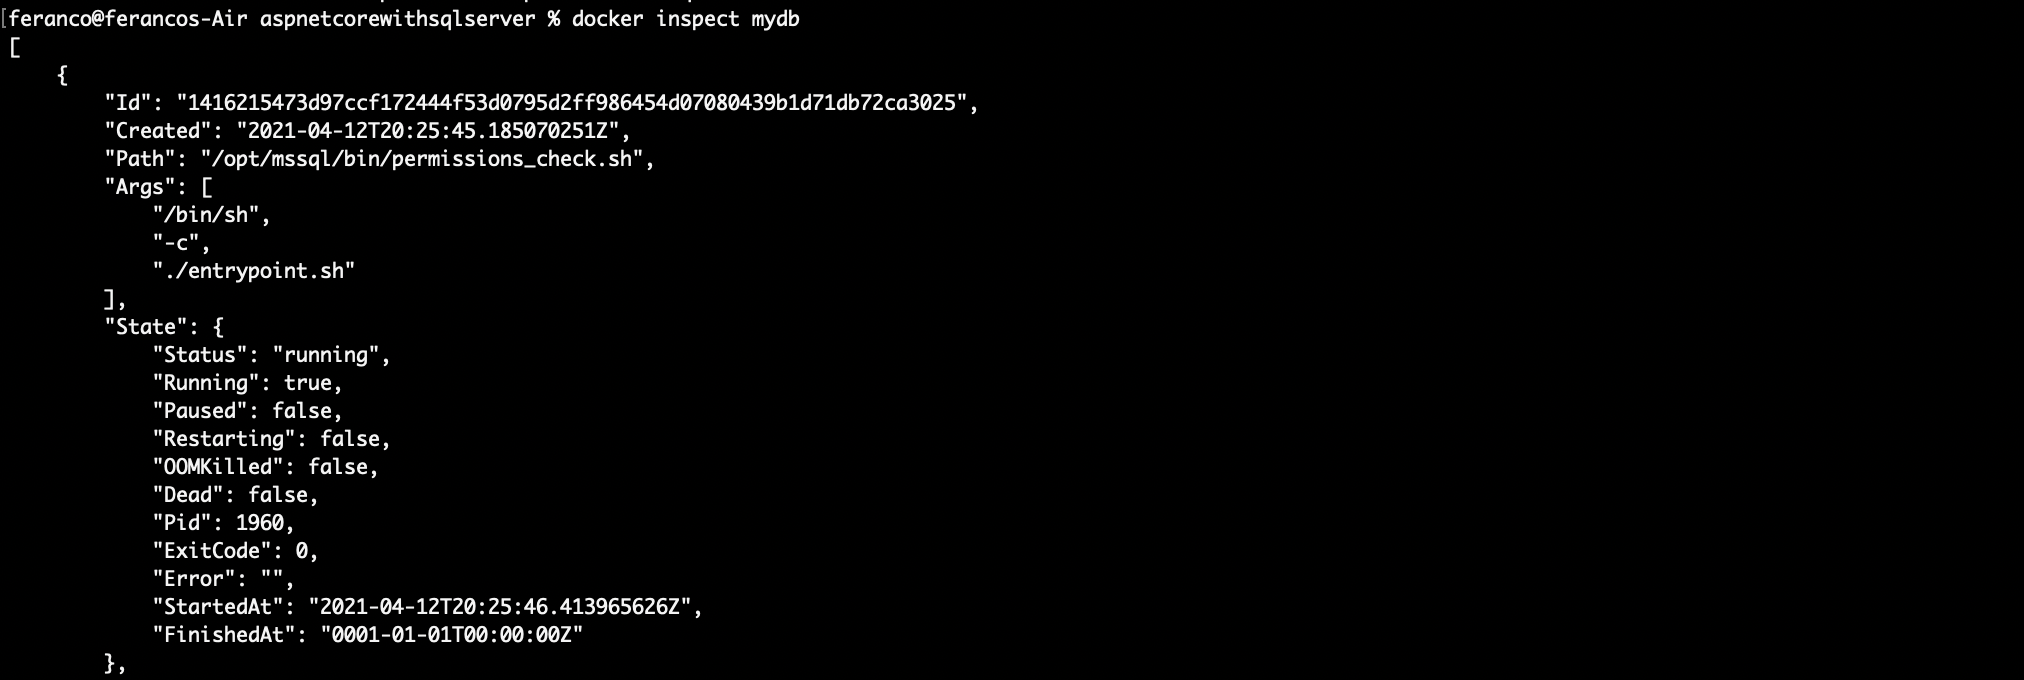
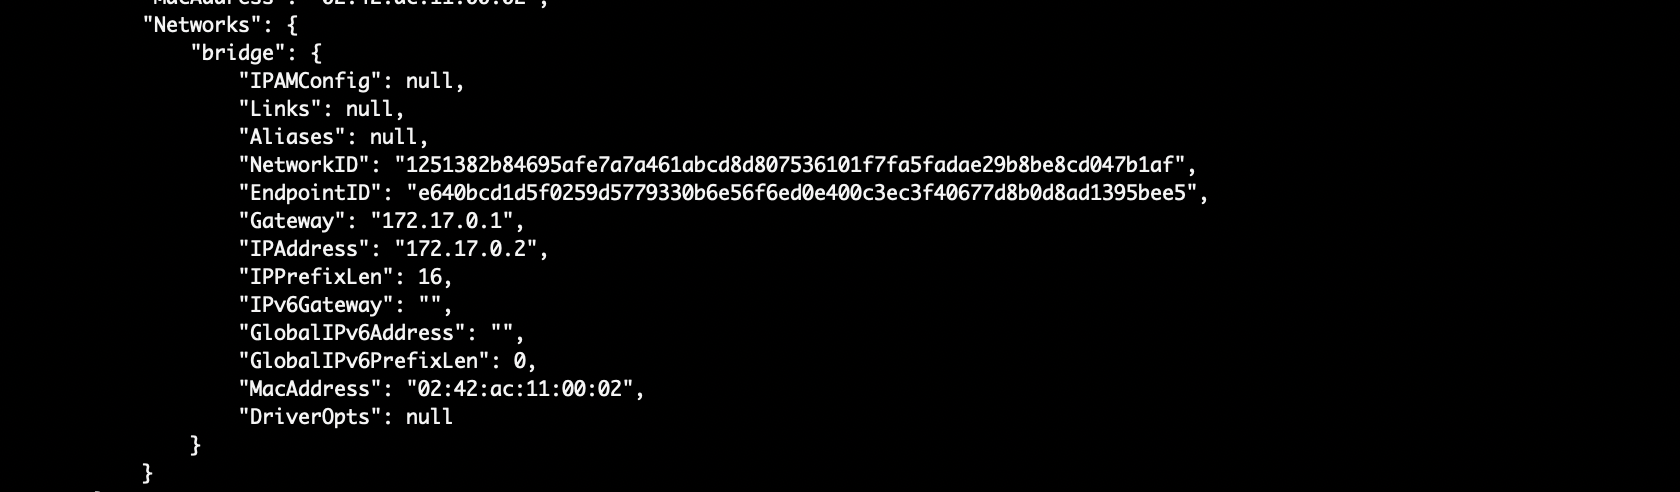
Run the command docker inspect mydb and note down the IP Address of the server. We need to know what is the IP address of the container running the server so that the web application can connect to it.
Change the working directory to the one of the web application and modify the Startup.cs file replacing localhost with the ip address of the server.
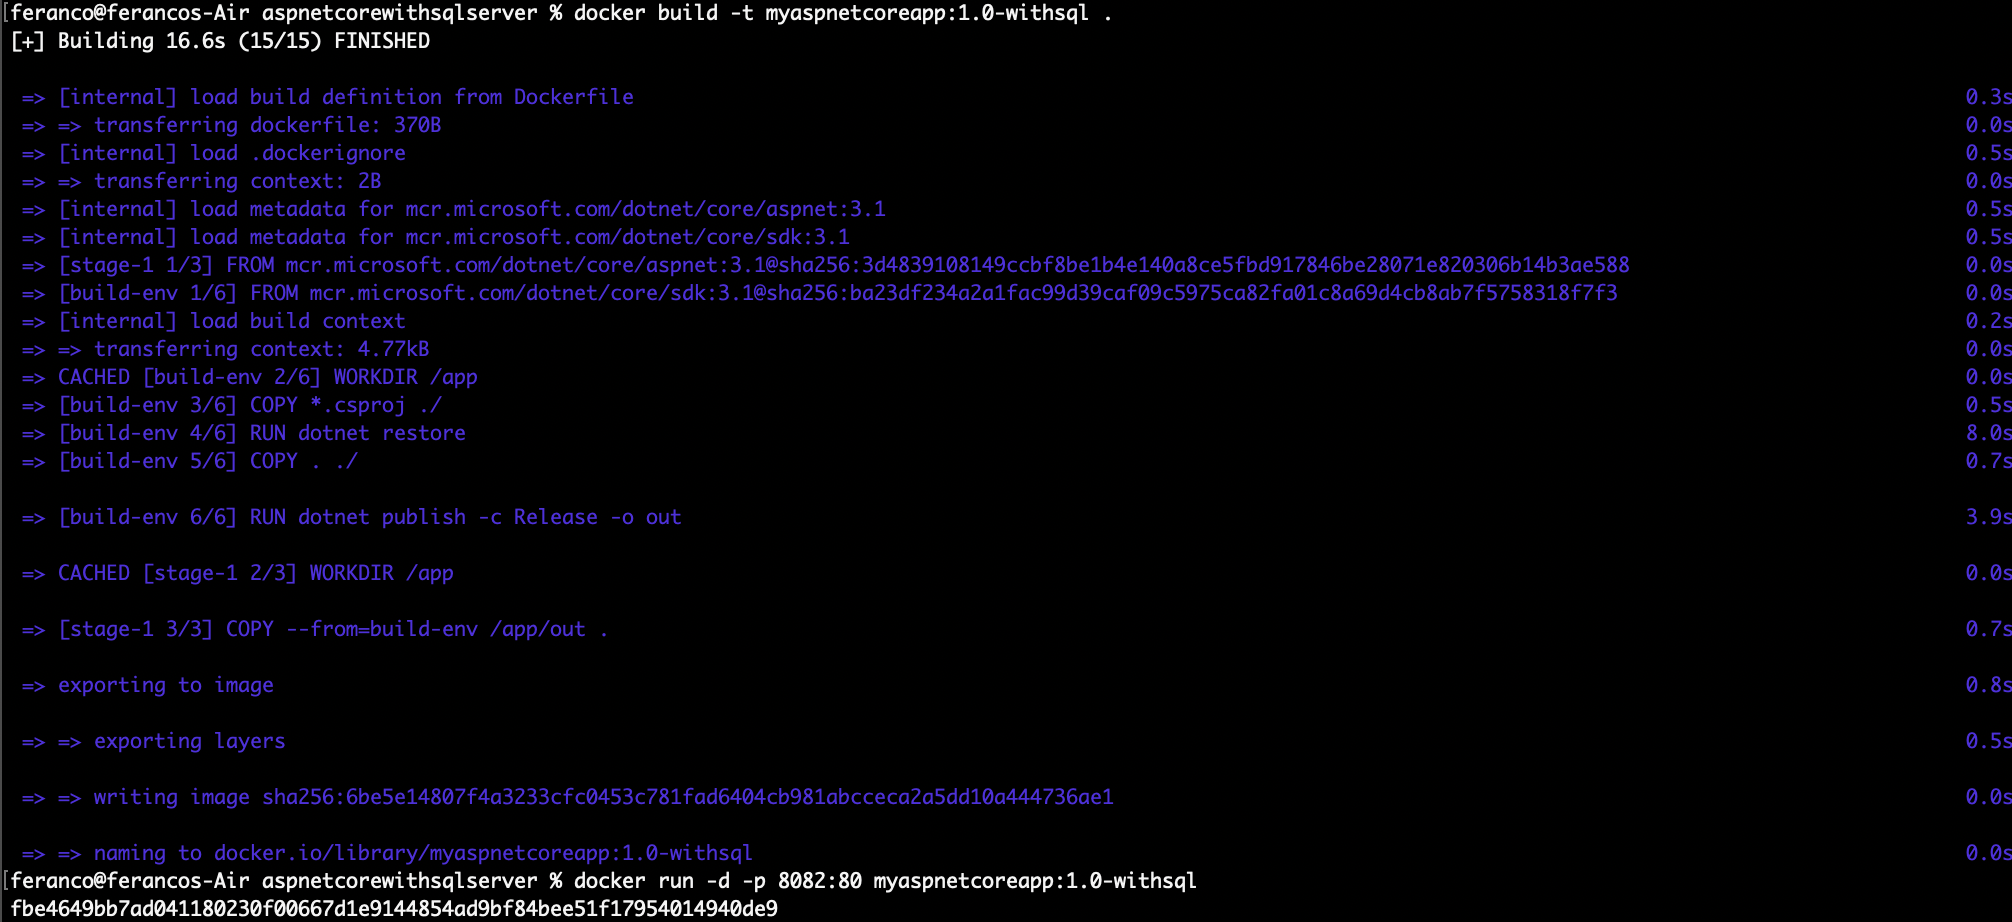
Build the ASP .NET Core web application using the command docker build -t myaspnetcoreapp:1.0-withsql .. Then run the container and expose the port 8082 with the command docker run -d -p 8082:80 myaspcoreapp:3.1-withsql.
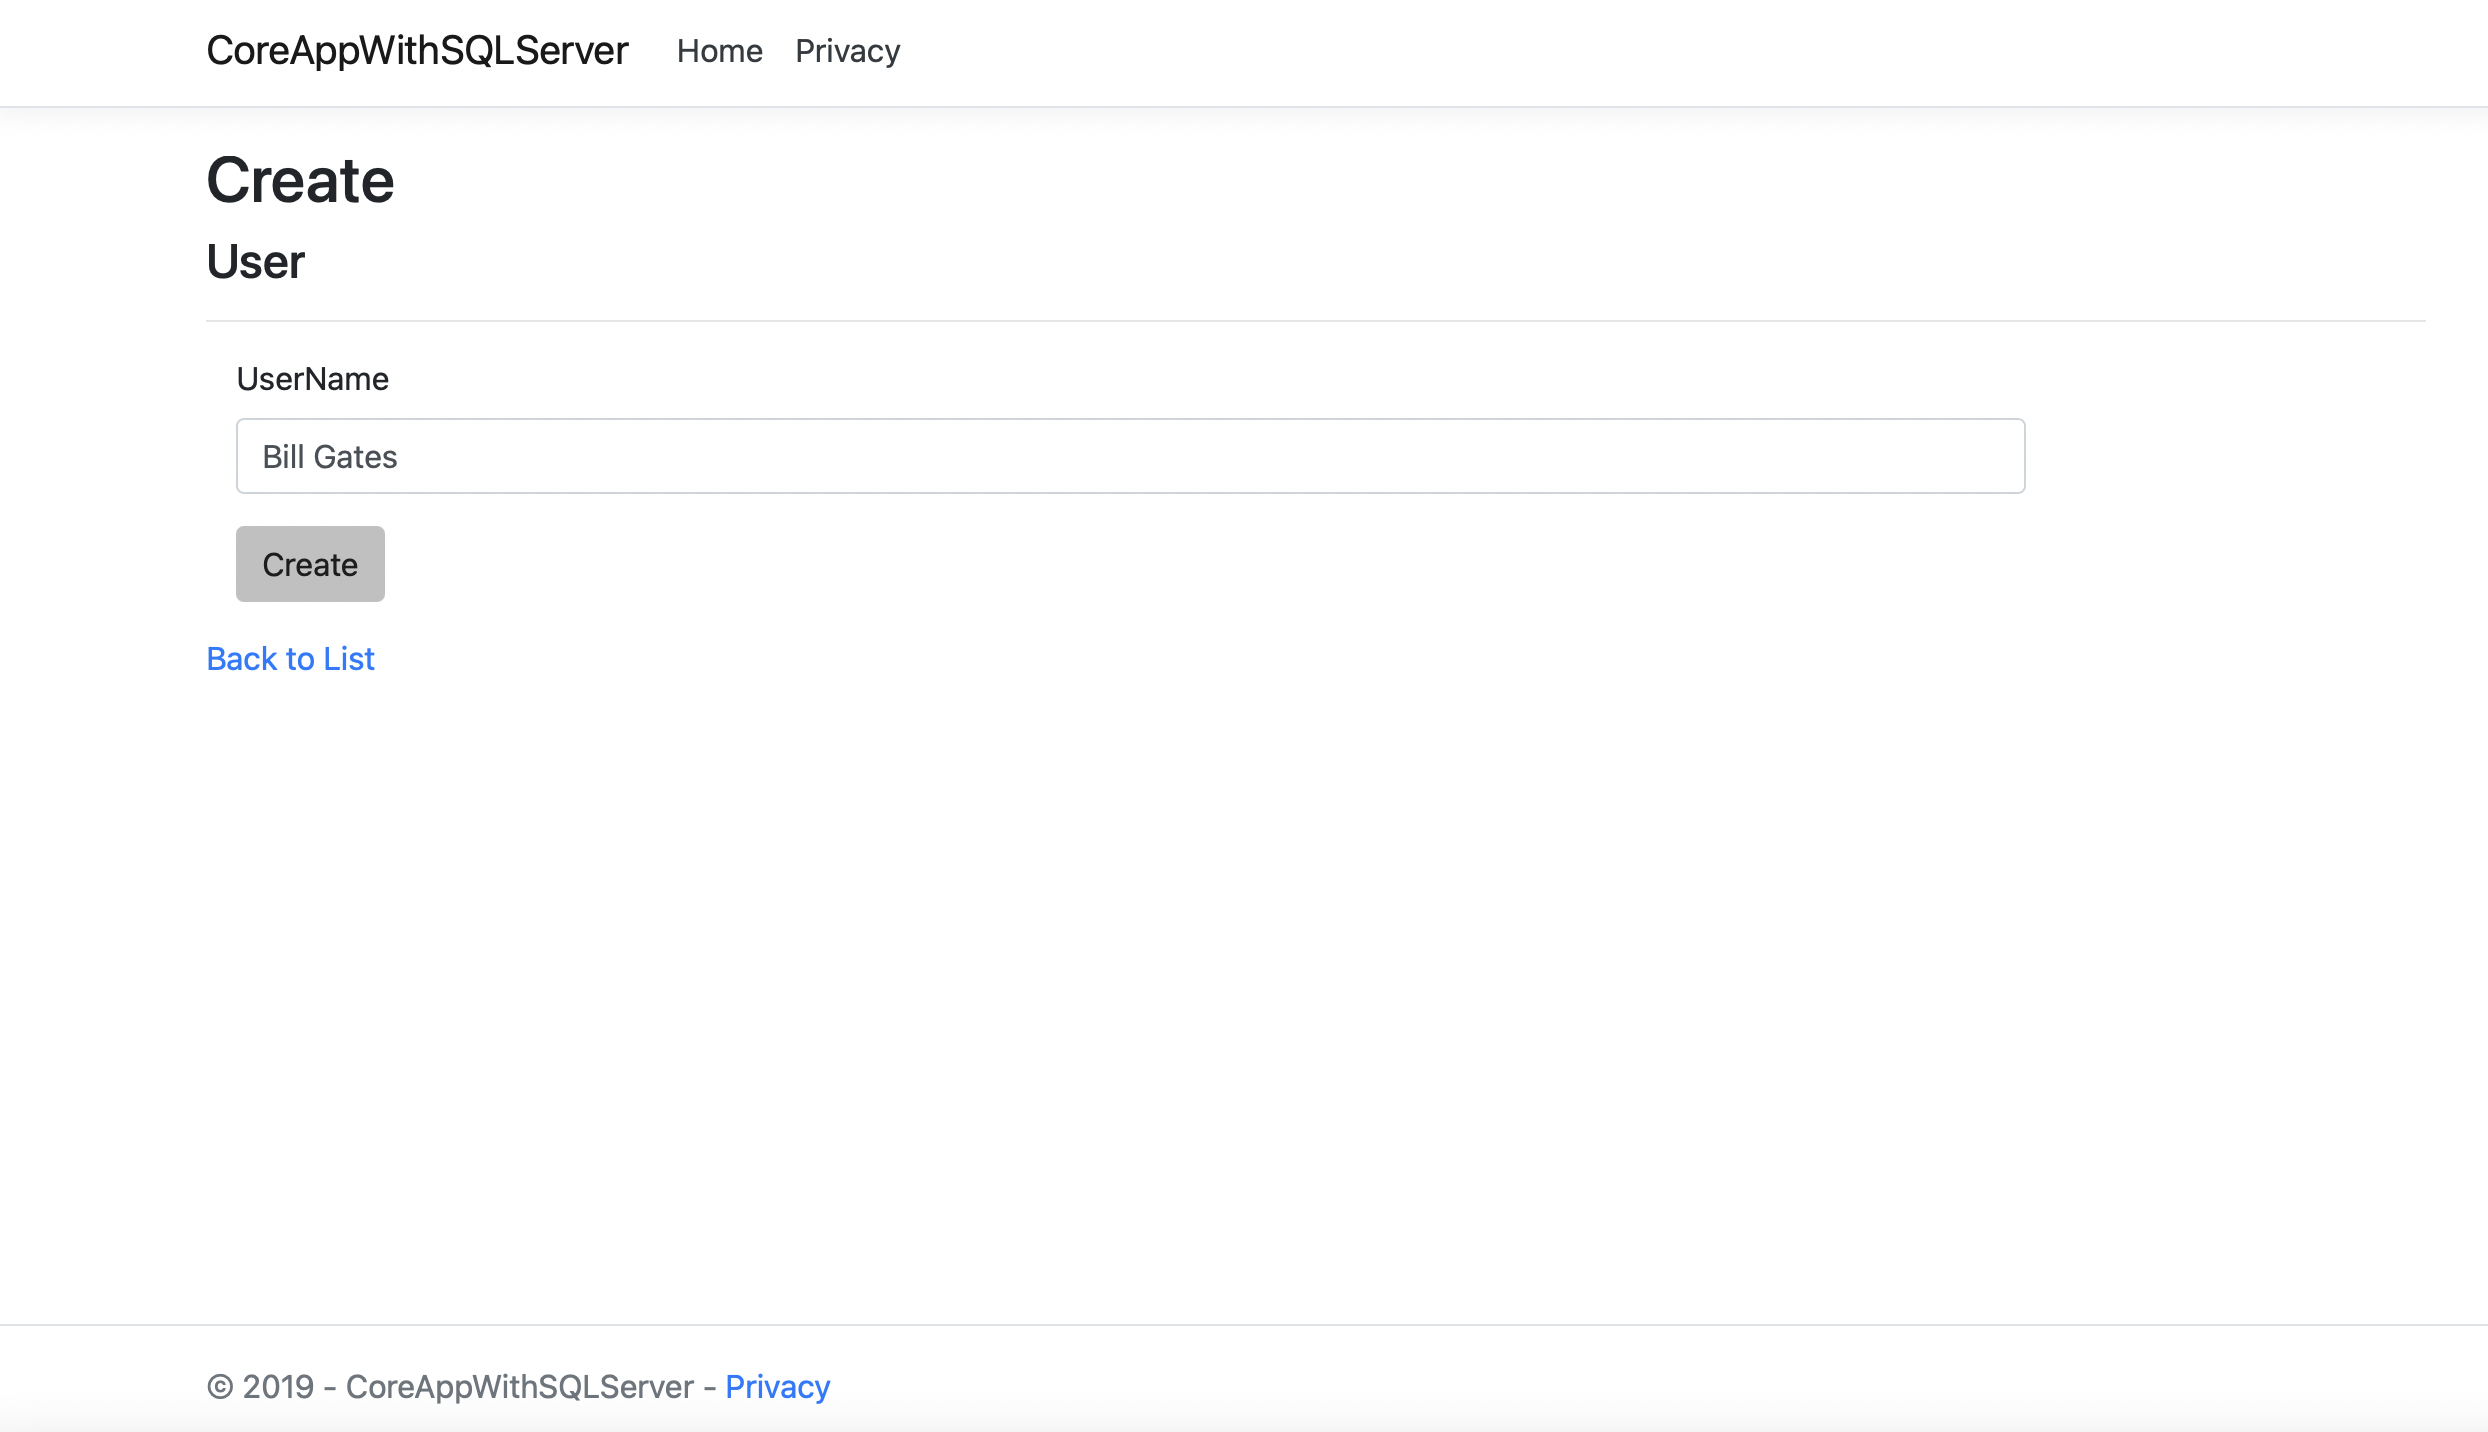
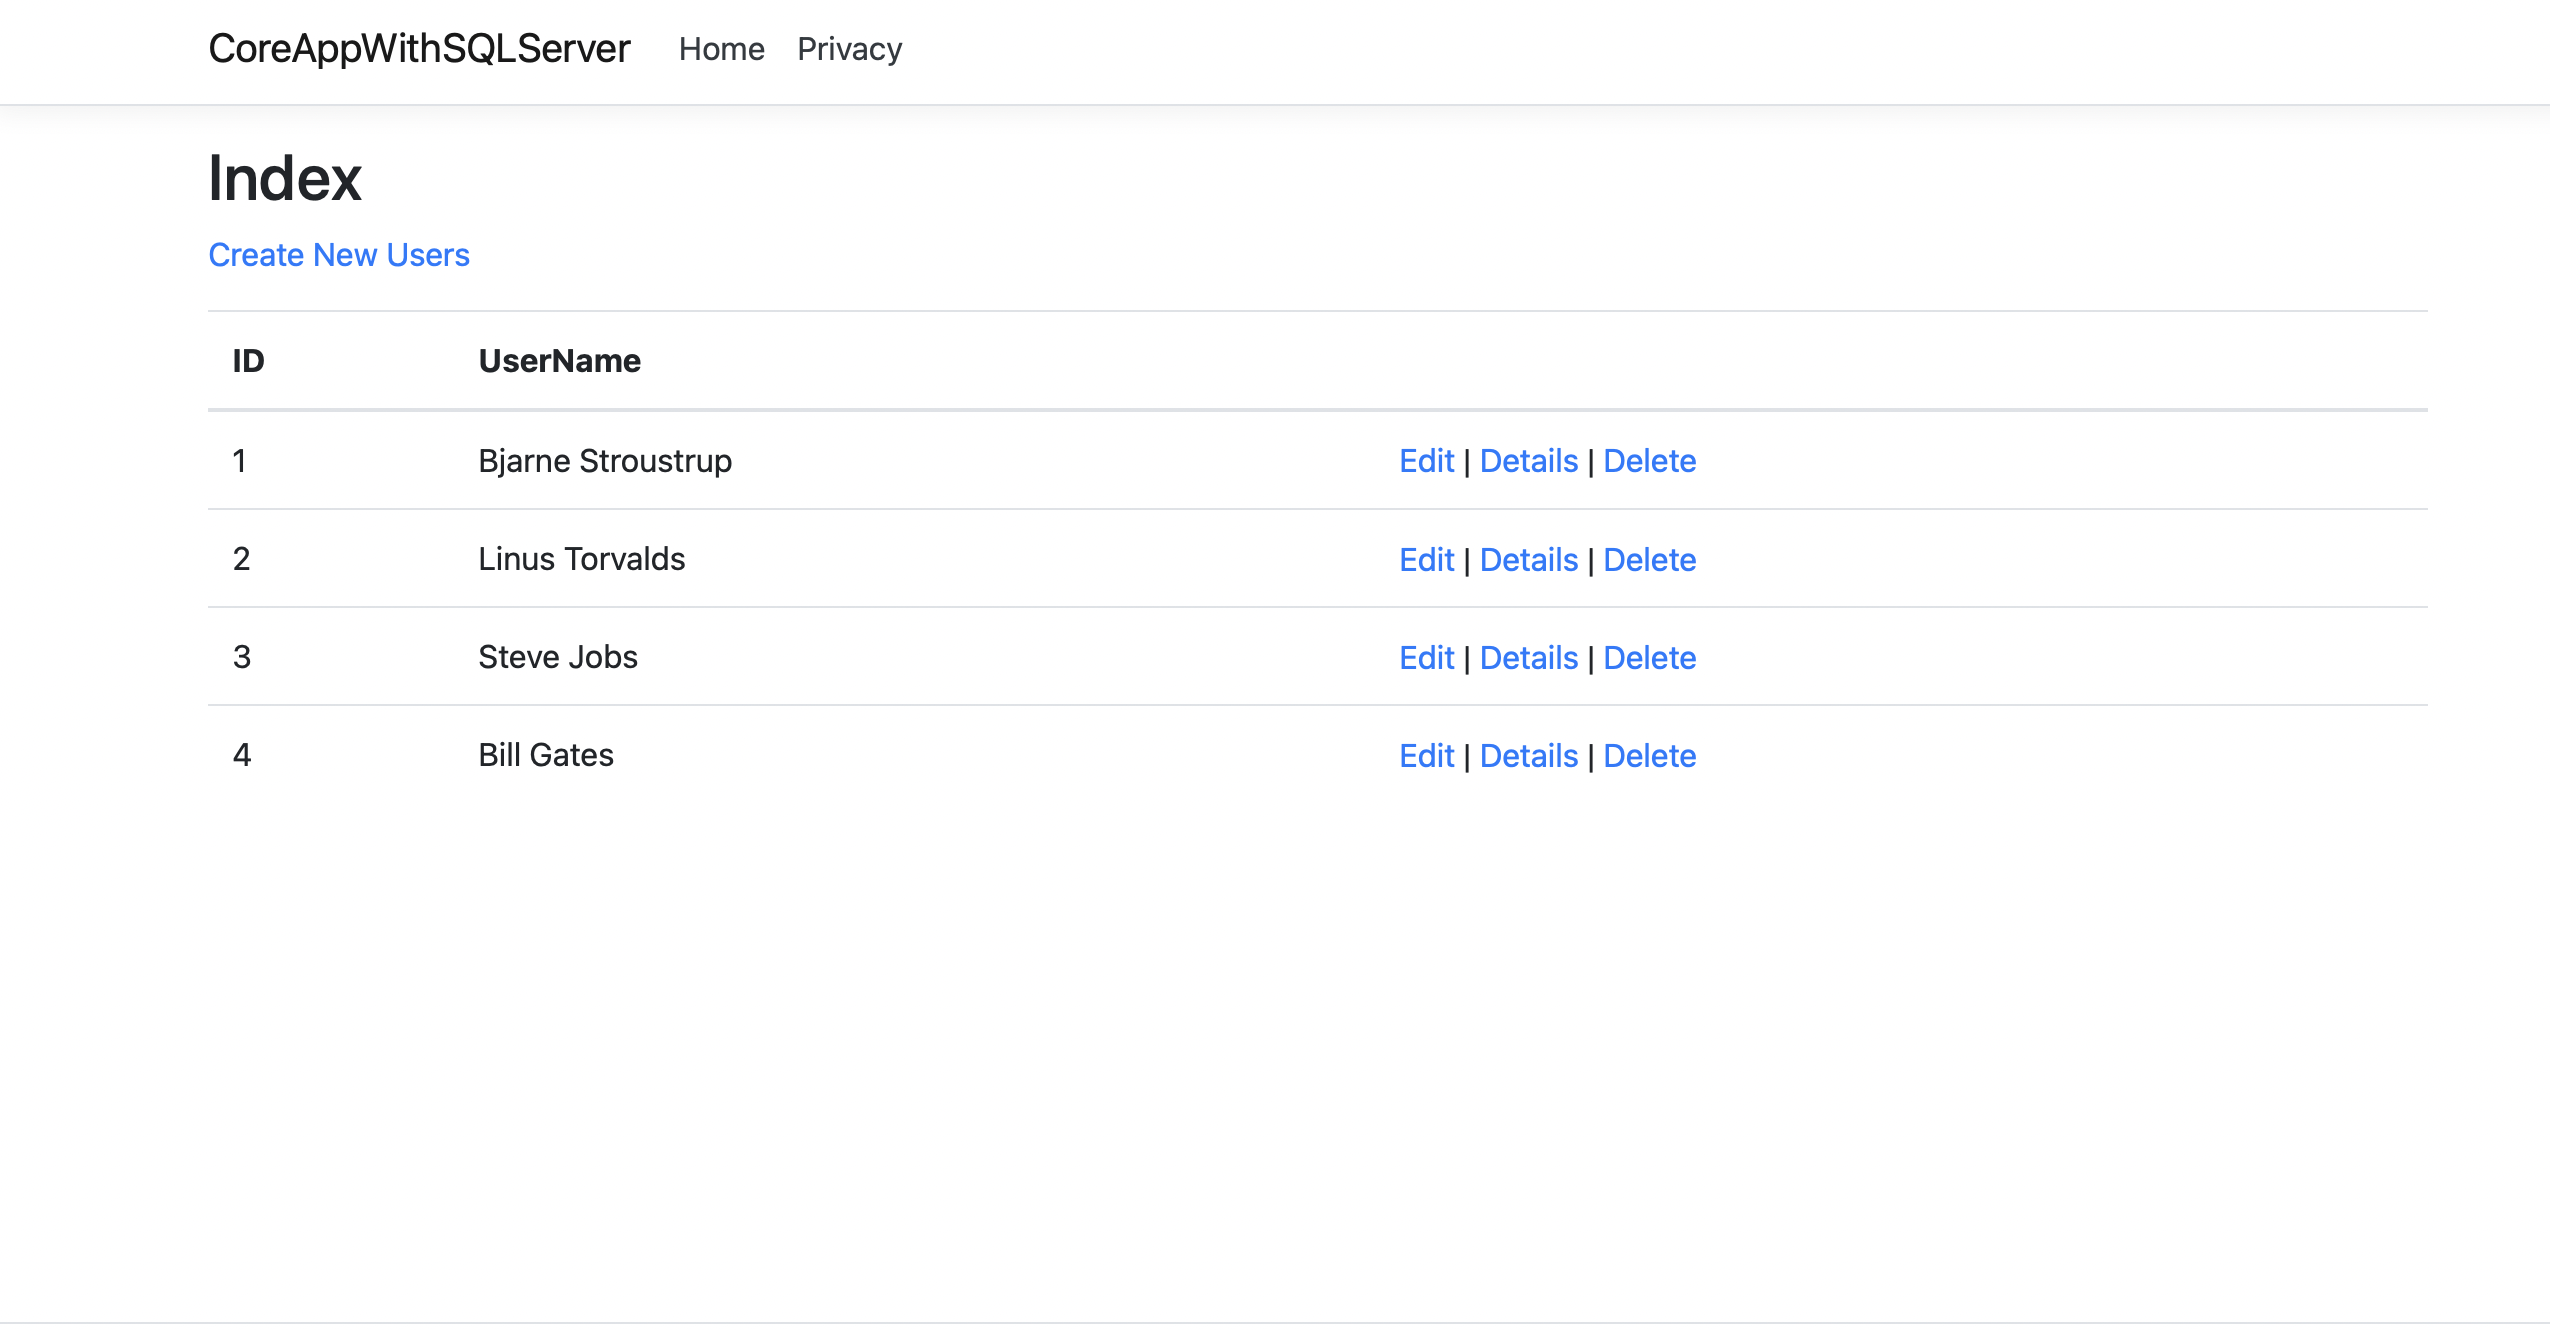
Open a browser and naviguate to the address localhost:8082. The web app should display the list of users defined in the database.
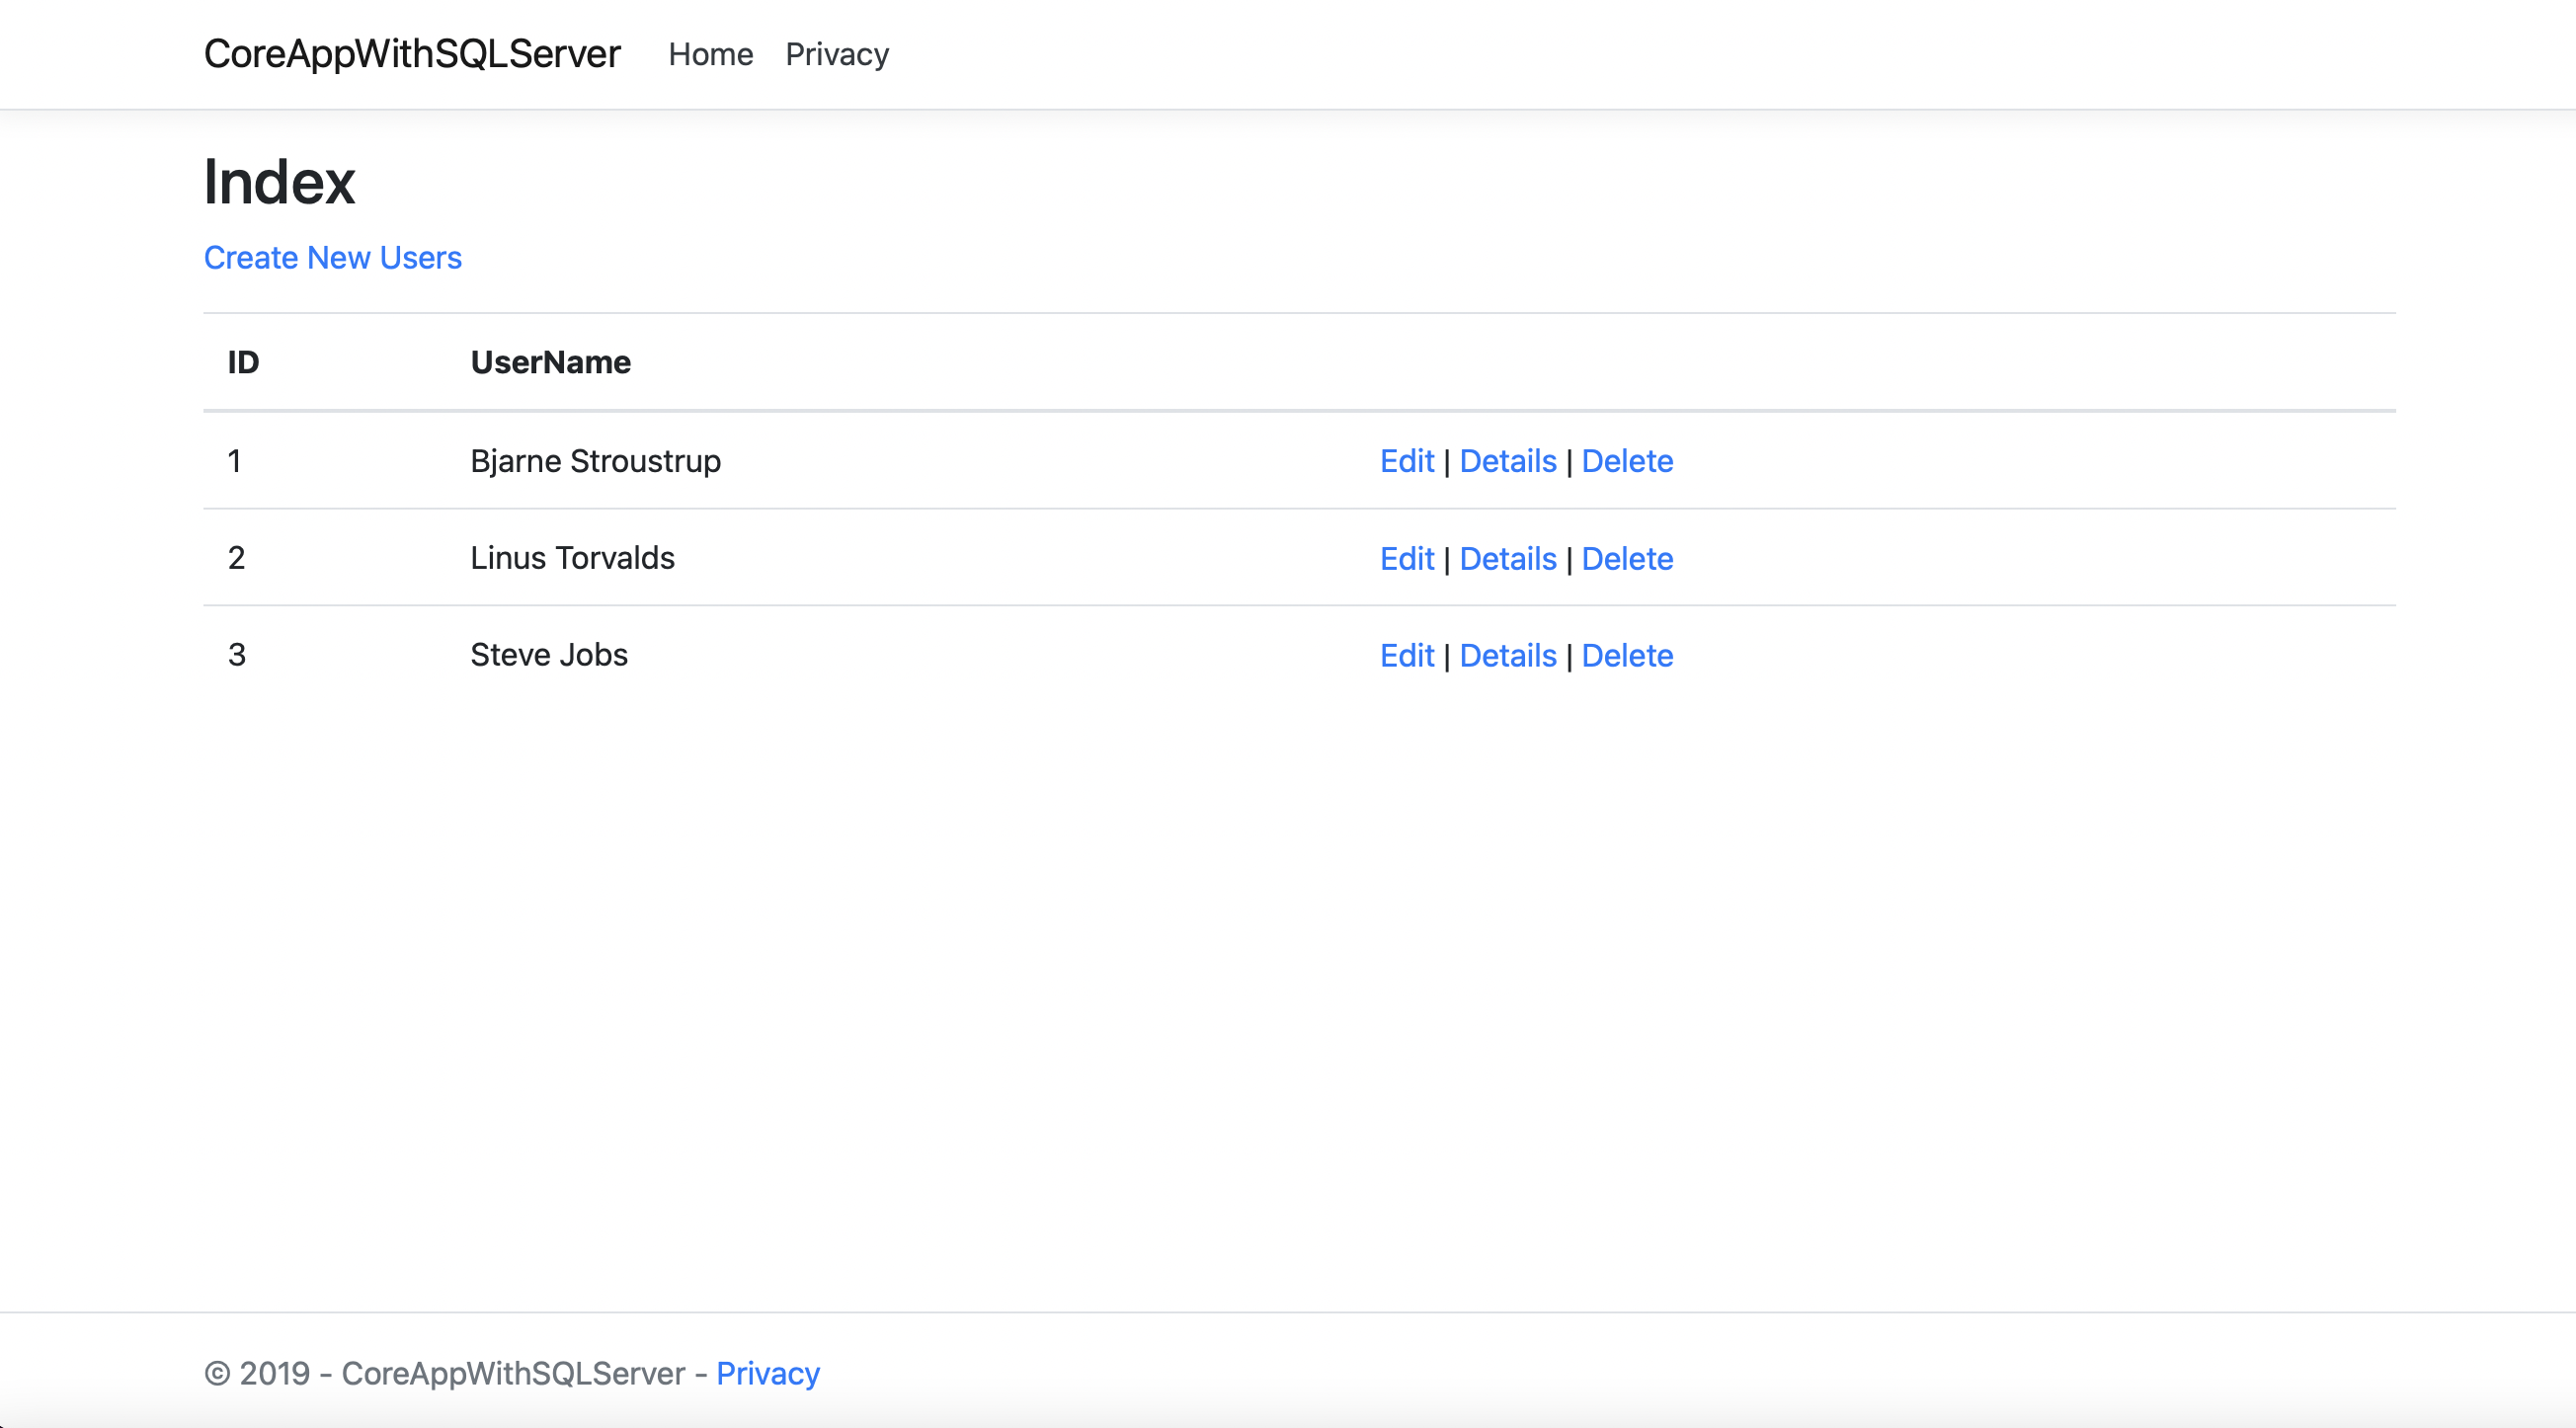
Click on Create New Users and add a new user name.
Run a new instance of the container and expose a different port (i.e. 8083) with the command docker run -d -p 8083:80 myaspcoreapp:3.1-withsql. Opening a browser at the address localhost:8083 we still see the new user that we have created since it is stored in the SQL Server container.
Working with Data Volumes Permalink
Docker containers are volatile by design and don't guarantee data persistence. This means that if we remove a container all the data that was in the container (running or stopped) will be lost. This certainly causes a challenge for applications that are running in the container and need to manage a state. A good example here would be the SQL Server Database we previously used. This file it is required to be persisted beyond the life of the container running the SQL engine. The standard solution is to use data volume to persist data independently of the container's lifecycle. Volumes are initialized when a container is created and they are never automatically deleted, even if they are no longer referenced by a container. This means we are responsible for cleaning up volumes ourself.
As a first step, let's see how we can mount a host directory as a data volume.
Create a directory on the host operating system called "HostData".
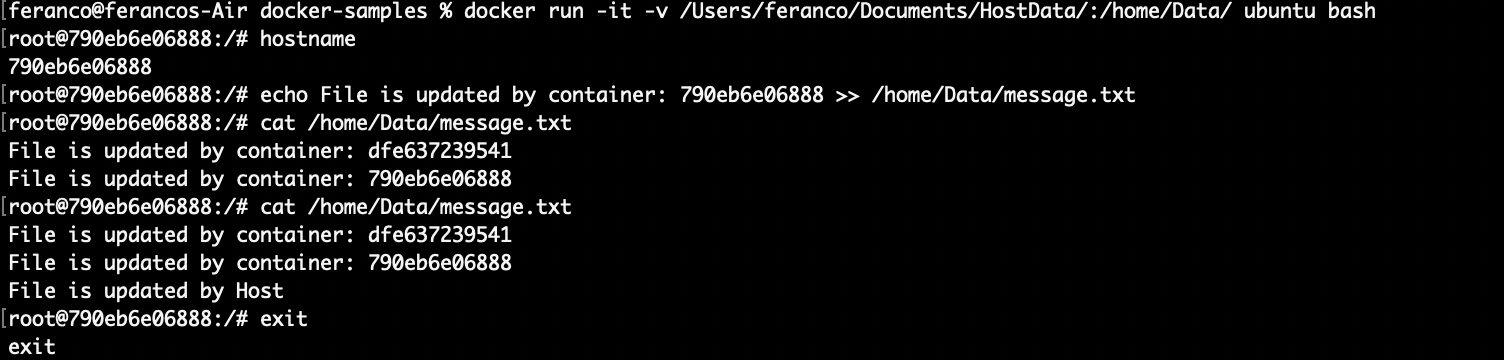
Run an Ubuntu container in interactive mode and mount the host directory as a data volume with the command **docker run -it -v
:/home/Data/ ubuntu bash**. Here the *-v* option mount the host directory HostData inside the container as /home/Data/. We can also choose the same name for the directory inside the container and the host but it's not mandatory. Check that the /home/Data/ directory exists inside the container by running the command ls /home.
Create a file in the /home/Data/ folder and add more text to it. Running the command: **echo File is updated by container:
>> /home/Data/message.txt**. The can be retrieved running the command **hostname**. Look at content inside message.txt by running the command cat /home/Data/message.txt

Exit the interactive mode using the exit command and run the command **docker inspect
**. Check the the section labeled "Mounts" to see the details about the mounted volume. 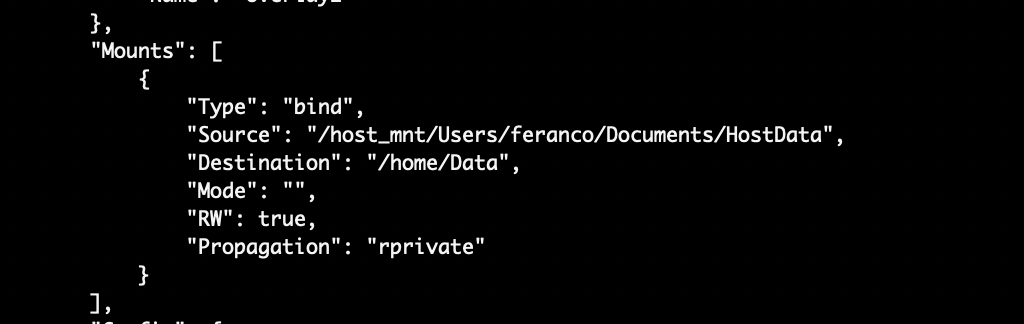
Run another container in interactive mode and mount the host directory as a data volume running again the command ç.
Add more text to the /home/Data/message.txt file with the command **echo File is updated by container:
>> /home/Data/message.txt**. Then look at content inside message.txt by running the command **cat /home/Data/message.txt**. The file should contain two update messages: this one and the one of the stopped container. Open the HostData/message.txt in the Host with a text editor and update again the file. Then go back to the Docker interactive session and use again the command cat /home/Data/message.txt. The file should also contain the update message from the host. Then exit from the interactive mode.
Mounting a directory on the host as a data volume is a very handy way to share the content from host to container, but it's not ideal in terms of portability. If we later run the container on a different host,there is no guarantee that this host will have the same directory. This would cause the application inside the container to break as it depends on a content that does not exist in the host. When a higher level of portability is desired, we can mount a shared storage volume using a volume plugins. The benefit of using shared volumes is that they are host-independent: a volume can be made available on any host on which a container is running as long as the container can access to the shared storage backend and has the plugin installed. Let's try to create and use a shared-storage volume using the local driver which uses local host for the storage. The exact same procedure will work with production ready storage drivers.
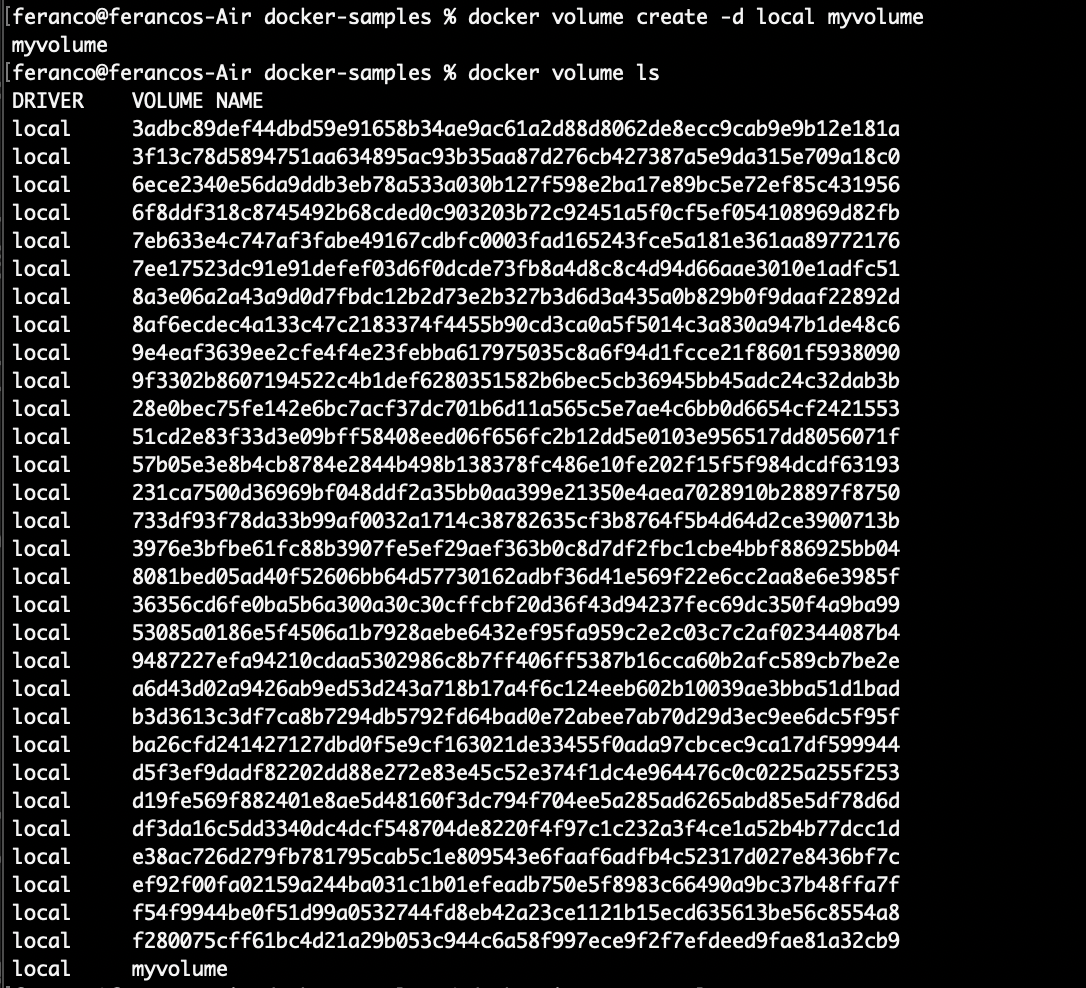
Create a volume by running the command following command docker volume create -d local myvolume
List all the volumes by running the command docker volume ls. The myvolume volume should be available as a local driver.
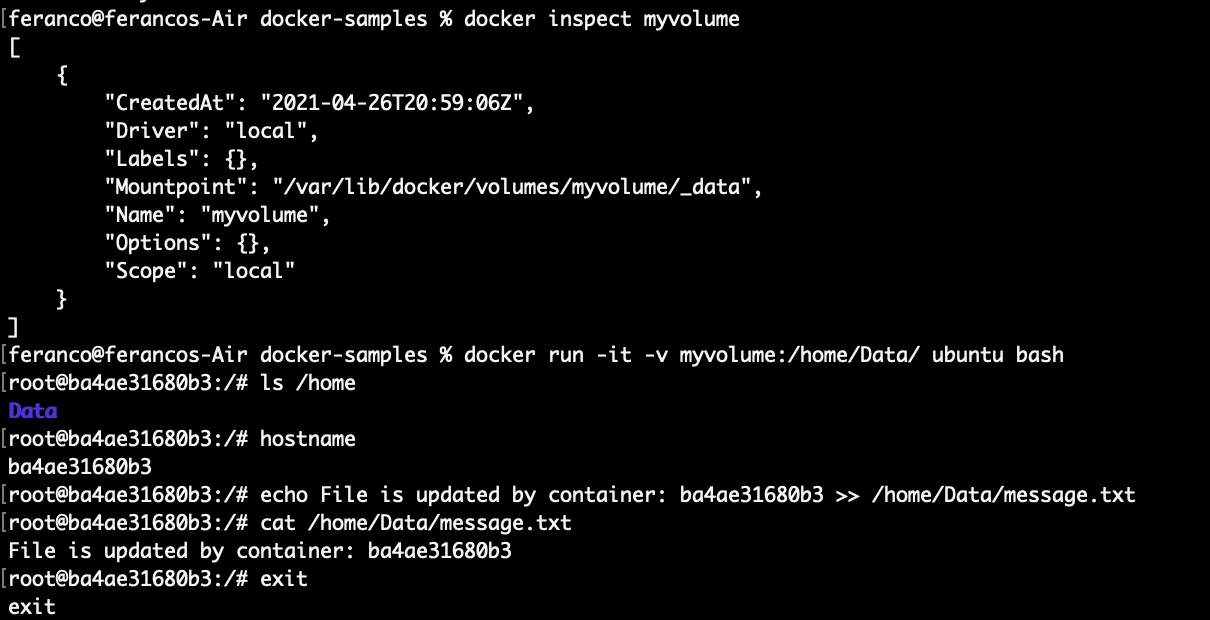
Run the command docker inspect myvolume. Here Mountpoint is set at a location on the C drive under the ProgramData\docker folder. This is the default location for local storage drivers. Using another commercial storage driver, the location will be different.
Launch a container and make that storage volume available inside the container running the command docker run -it -v myvolume:/home/Data/ ubuntu bash.
Check that the /home/Data/ directory exists inside the container by running the command ls /home.
Create a file in the /home/Data/ folder and add more text to it. Running the command: **echo File is updated by container:
>> /home/Data/message.txt**. Look at content inside message.txt by running the command cat /home/Data/message.txt, then exit the interactive mode.
Docker Networking Permalink
Let's see some Docker CLI commands to view Docker default networks and create a custom bridge network.
Run the command docker network ls to view the list of networks available to docker. The 'bridge' network is the default network for containers running on Linux. Any containers that run without any flags or arguments to implement specific network configurations will be attached to the default 'bridge' network and automatically assigned an IP address from the 'bridge' network's internal prefix IP range.
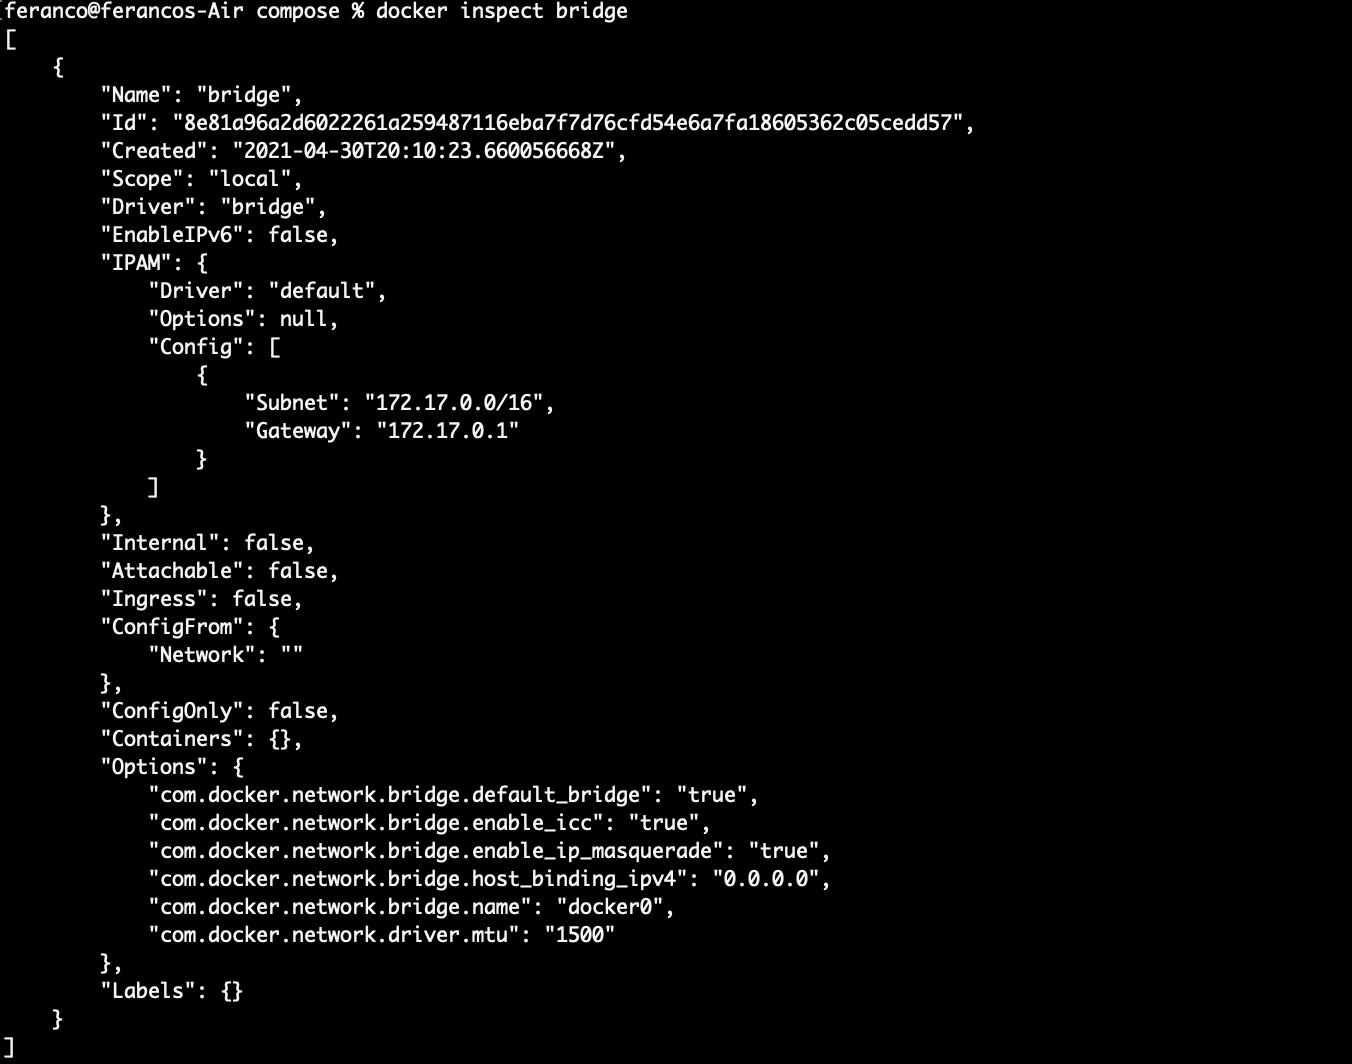
View detailed information about the Docker default bridge network using the command docker inspect bridge. The "Containers" key refers to all containers that are using the specified networkand it is empty because there are no containers currently running.
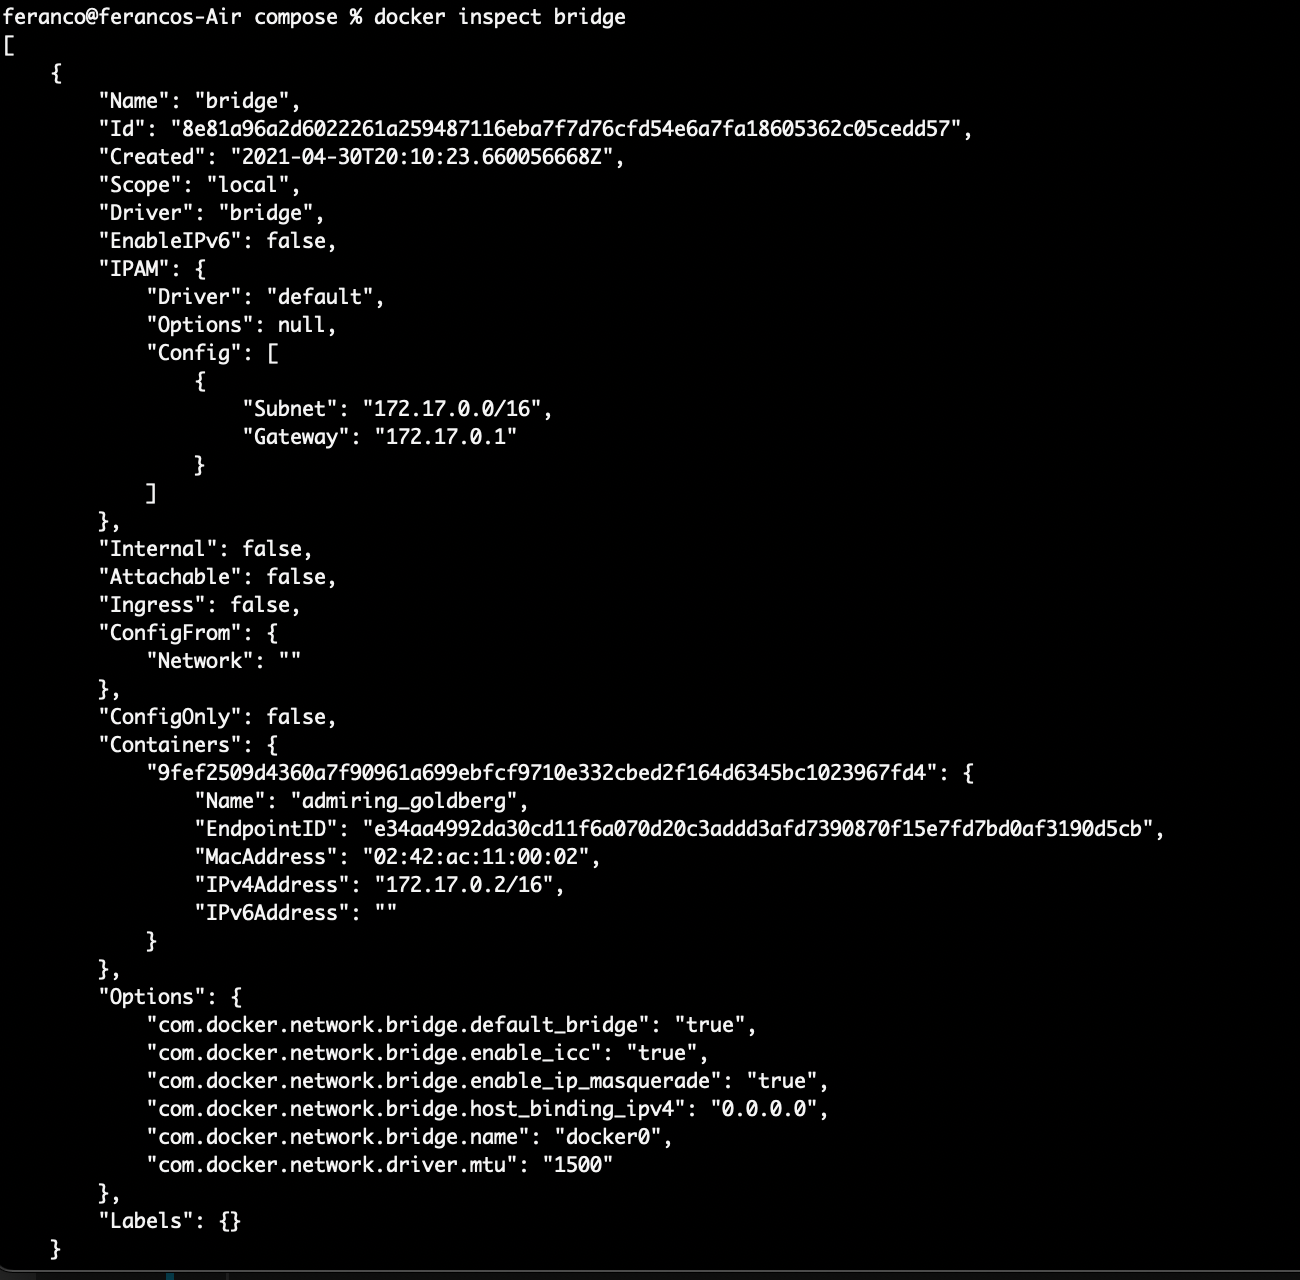
Launch a new container by running the command docker run -d adiazmor/docker-ubuntu-with-ping ping localhost. Run again the command docker inspect bridge and check that the "Containers" key now includes information regarding the container that is using the bridge network.
Create a new docker network by running the command docker network create -d bridge –subnet=192.168.15.0/24 –gateway=192.168.15.1 custom-bridge. Here the -d flag stands for network driver and specifies the network type we want to create ("bridge"in this case). We are also providing the IP prefix and gateway address using the –subnet and –gateway option.
Use the docker network ls command and check that the "custom-bridge" network is available.

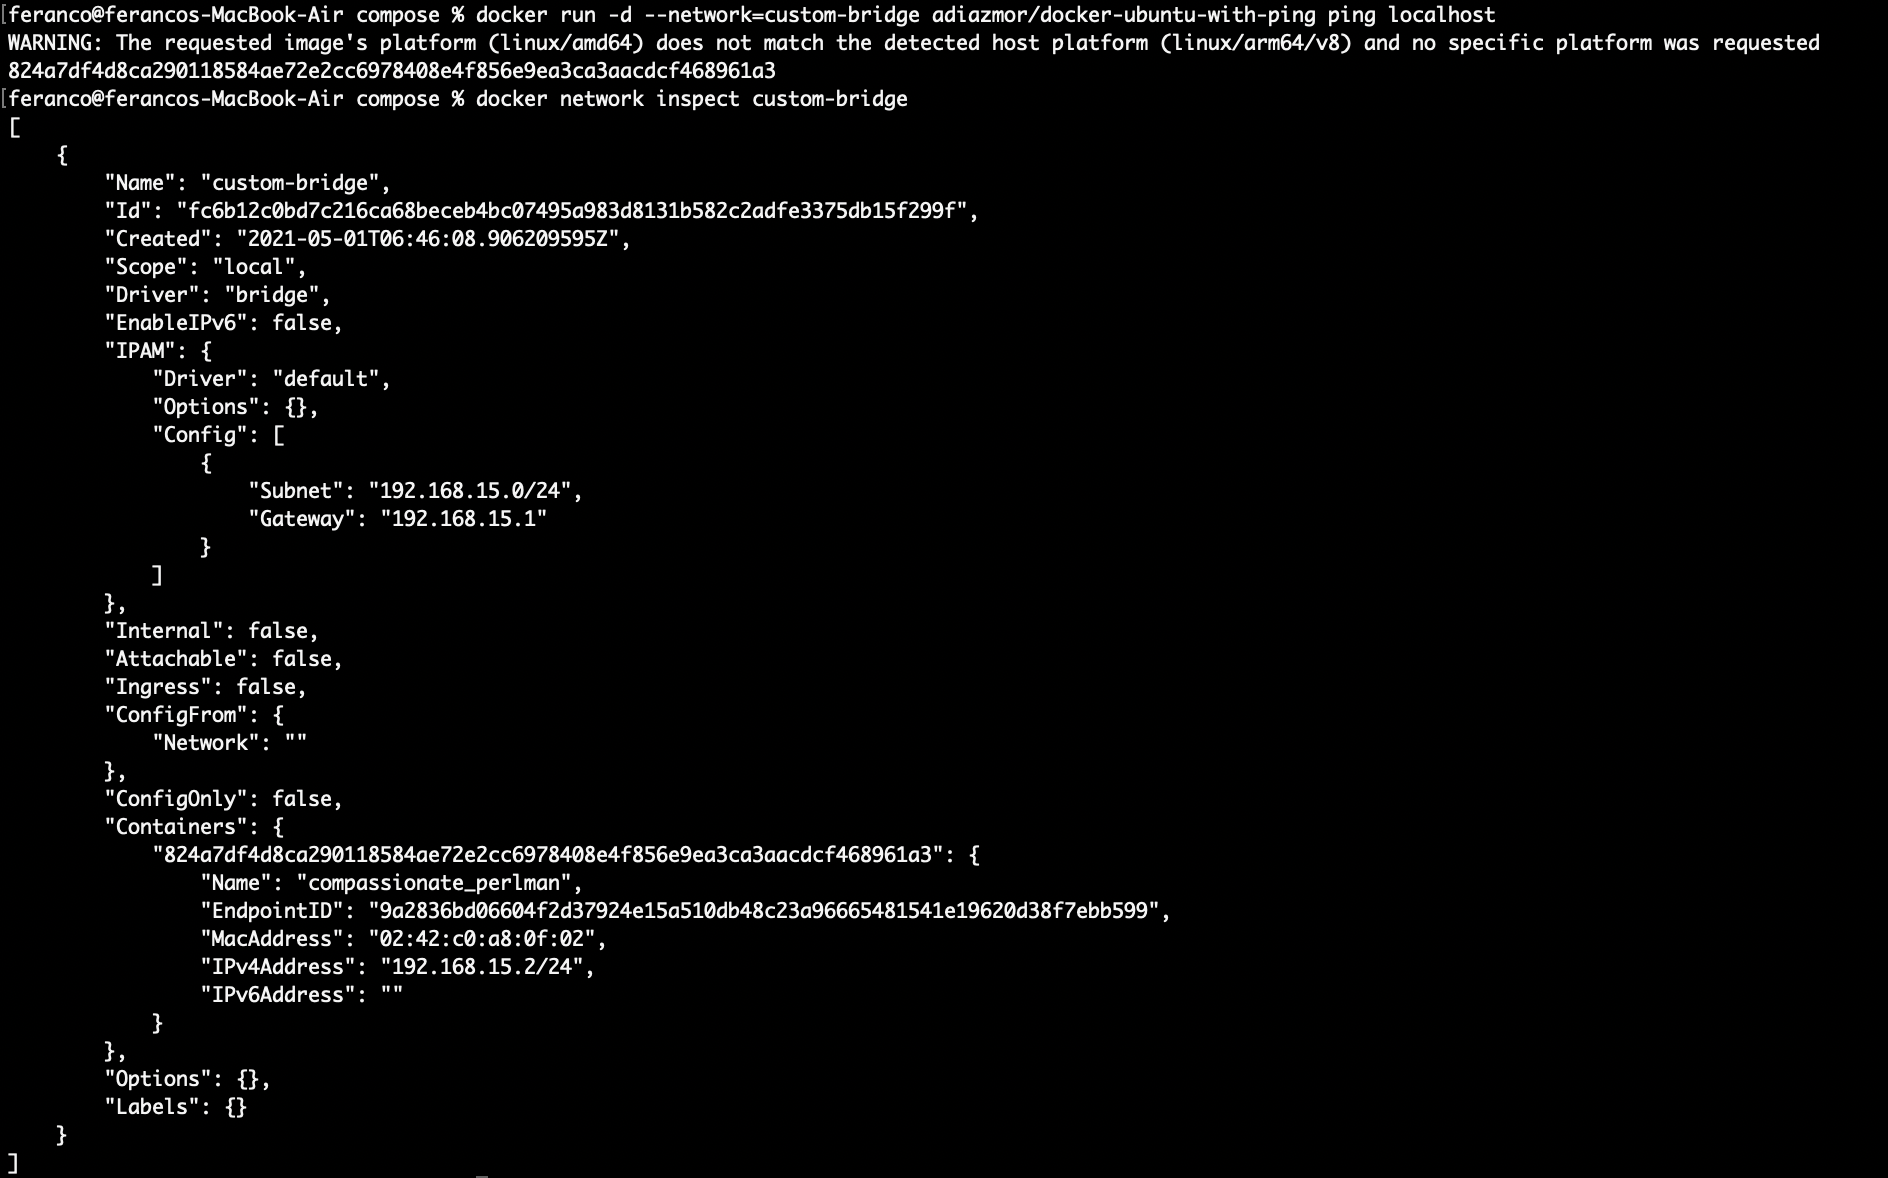
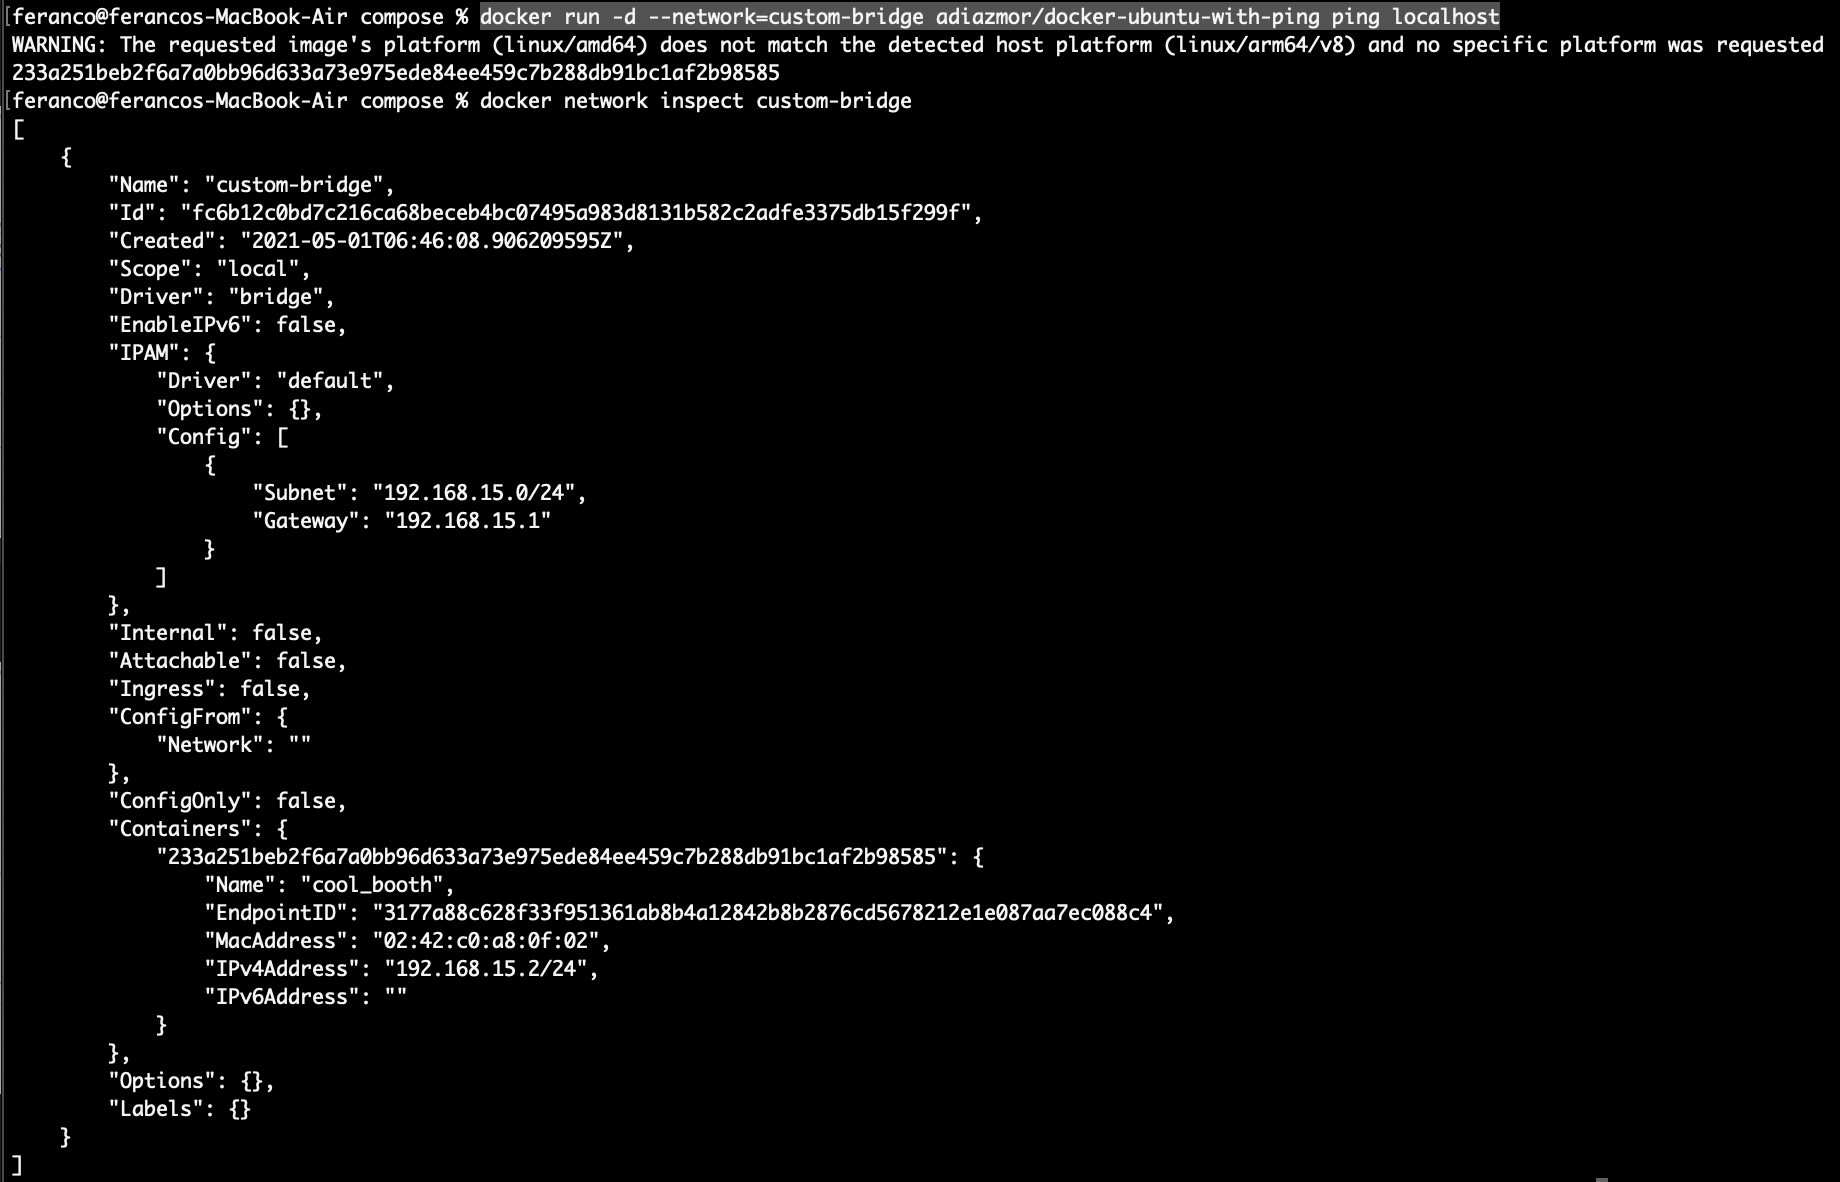
Launch a new container using the new custom bridge network with the command docker run -d –network=custom-bridge adiazmor/docker-ubuntu-with-ping ping localhost. Here the –network option force docker to use specific network for the container. Then use the docker network inspect custom-bridge command to get the detailed information about custom-bridge network and the container that is using it. Notice how the subnet and gateway values reflect the values we used during the creation of the network. Also note that the container IPv4 Address, 192.168.15.2 is in the custom-bridge network.
Remove all the containers with the command docker rm (docker ps -aq) -f. Then remove the custom-bridge network with the command docker network rm custom-bridge. Check that only bridge network remains with the command docker network ls.
Working with Docker-Compose Permalink
Docker-compose is a tool for defining and running multi-container Docker applications. To use compose, we first need to create a .yml file describing which containers we want to start, the corresponding images name and the registry name. Once this file has been created, we can then use a single command to start and stop all the containers. Let's see how Docker-compose work using a simple "Famous Quotes" application that consists of a frontend web app that talks to a RESTful API to fetch quotes in JSON format. Both the web app and API are developed using ASP.NET Core and each will run in a separate container.
Inspect the docker-compose.yml file. This file will ensure that the web API can be accessed by the web application without hardcoding its domain name or IP Address. This is not necessary since docker-compose will make these services discoverable. The file also defines specific dependencies, such as the web app container will depend on the web API container.
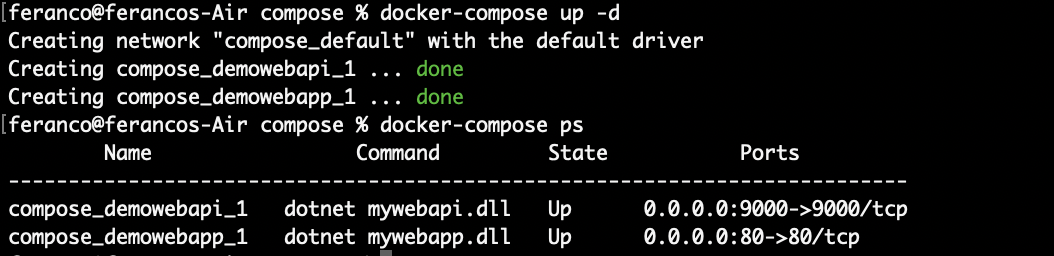
# Docker-compose version
version : '3'

services:
demowebapp:
    # Build instruction pointing to the folder containing the web application
    # and its dockerfile. This is equal to the docker build command for that application.
    build: ./mywebapp
    # Map host port 80 to container port 80
    ports:
    - 80:80
    ## Express dependency between applications
    depends_on:
    - demowebapi
demowebapi:
    build: ./mywebapi
    # Map host port 9090 to container port 9090
    ports:
    - 9000:9000
Run the multi-container application with the single command docker-compose up -d. Here the -d option works the same as when used with the docker build command instructing docker to run the container in the background rather than interactively.
Check details about running docker-compose services by executing the command docker-compose ps
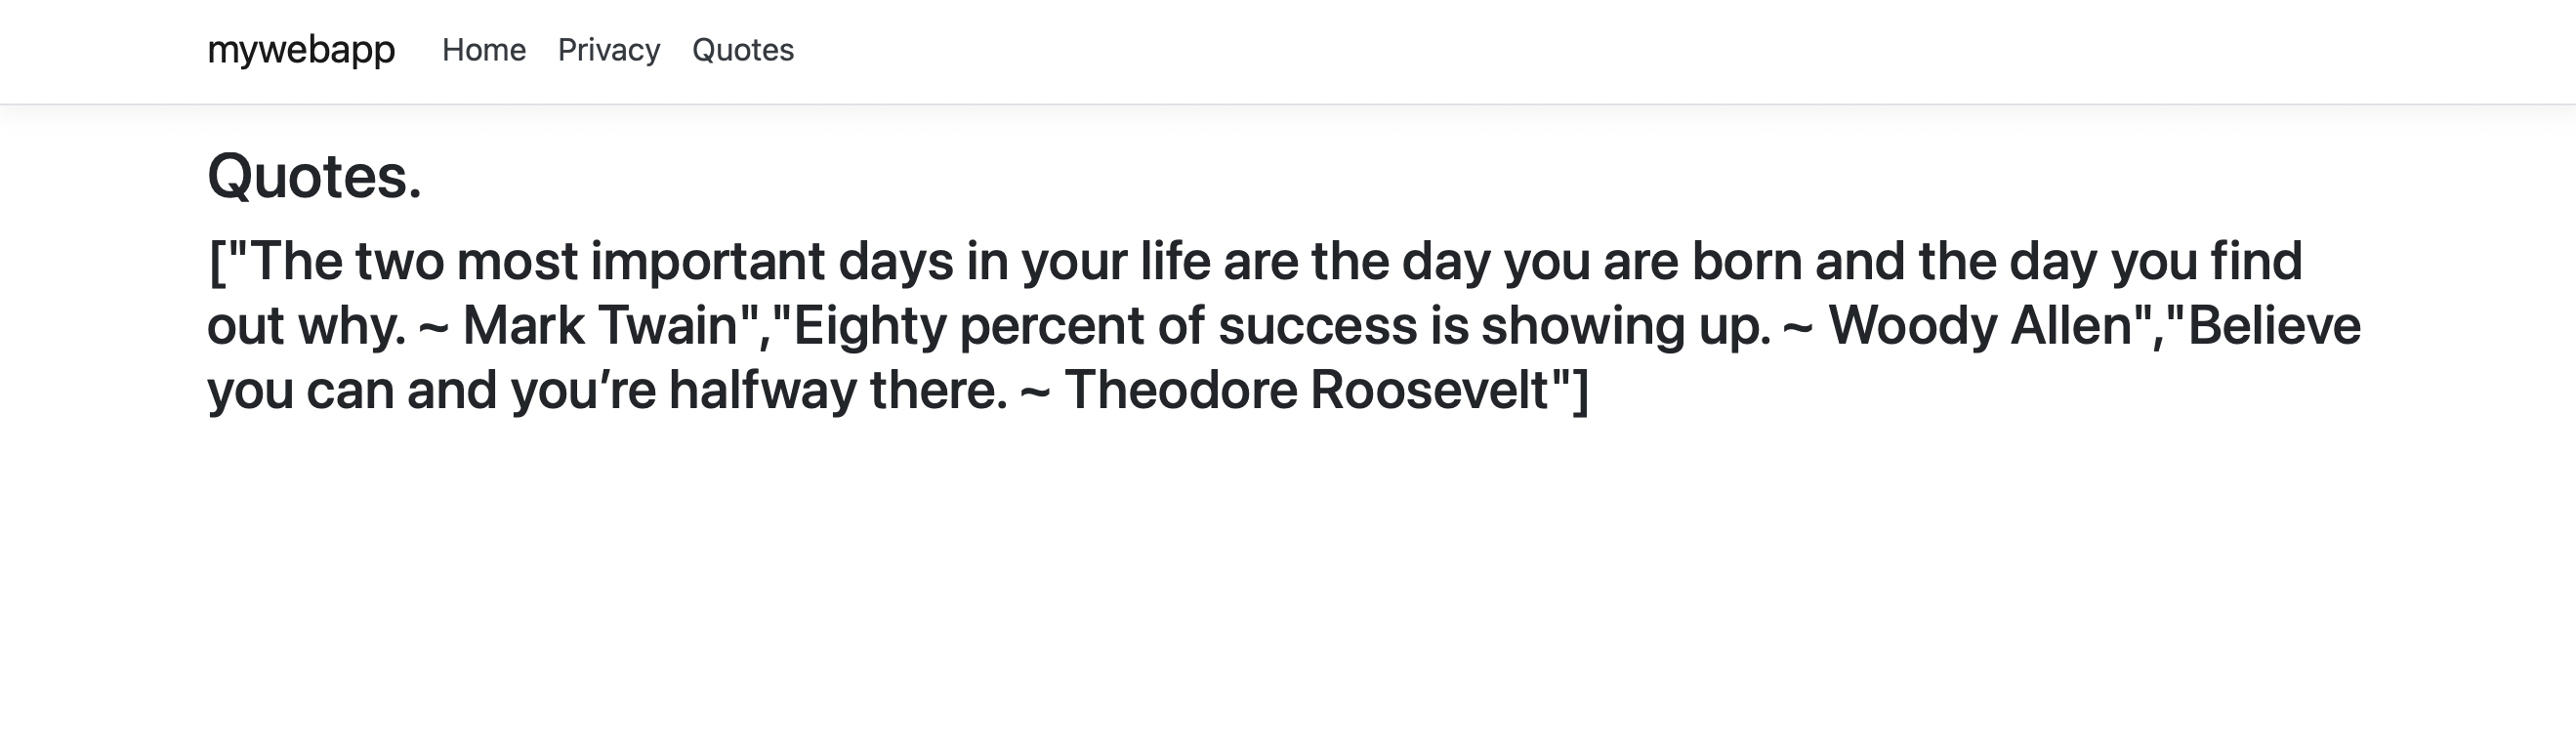
Open a web browser and browse to localhost to land on the home page of web application. Then test the Web API selecting the Quotes option from the top menu bar. This will generate a call to web API and the results will be displayed on the web application.
Stop and remove the multi-container application with the single command docker-compose down -d. If we only wish to stop the multi-container applications and the associated running containers without removing them we cab use the docker-compose stop command instead.
Docker allows us to create custom networks. Let's try to create and configure a custom bridge network replacing the default one.
Create a new docker network by running the command docker network create -d bridge –subnet=192.168.15.0/24 –gateway=192.168.15.1 custom-bridge.
Use the docker network ls command and check that the "custom-bridge" network is available.

Launch a new container that uses the new custom nat network with the command docker run -d –network=custom-bridge adiazmor/docker-ubuntu-with-ping ping localhost. Here the –network option force docker to use a specific network for the container. Then use docker network inspect custom-nat command to get the detailed information about custom-nat network and container that is using it.
Conclusion Permalink
If you have successfully completed all the tasks and exercises proposed in this article, congratulation! You are now certainly more familar with the Docker CLI and ready to experiment yourself.