What exactly are containers and what is Docker?

This post explains the main concepts behind containers, focusing on Docker as containerization platform.
Containers are a streamlined way to package and run software applications. They allow to build any application in any programming language using any operating system (OS). Containerized applications can run anywhere on anything and can also be more efficiently deployed into cloud environments.
This post introduces the concept of containers with a particular focus on the Docker platform.
Containers vs Virtual Machines
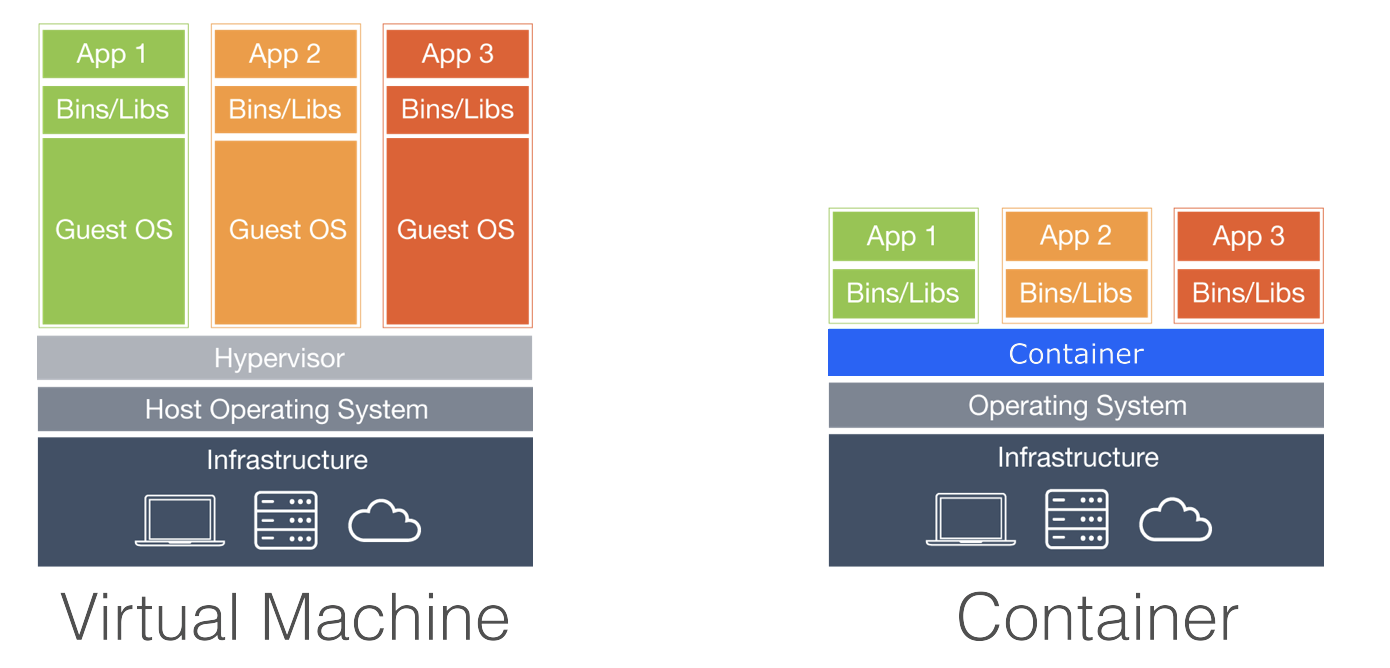
The concept of container somehow remainds to Virtual Machines (VM), but there are significant differences between them.
A VM is like a single house, where an application lives without sharing resources. Each VM has a full OS which includes its own kernel, file system, network interfaces, and so on. The VM operating system is completely separated from the one of the host, creating an execution environment that overcomes most of the drawbacks of running applications directly on the host OS.
A container is like an apartment in a building, where an application has individual resources but also shares core resources with the other apartments. Each container has a very small OS (i.e. 100 MB for windows nanoserver) and uses the host OS for additional resources. Containers offer an alternative to running applications directly on the host or in a VM that can make the applications faster, more portable, and more scalable.
This is a short summary of the advantages of using containers:
- small footprint (no more a full OS to run a single application)
- fast startup time and reduced CPU consumption
- high portability (all what is needed to run the application is packaged together)
- isolation (each container has a slice of OS and memory separated from the one of the other containers)
Docker
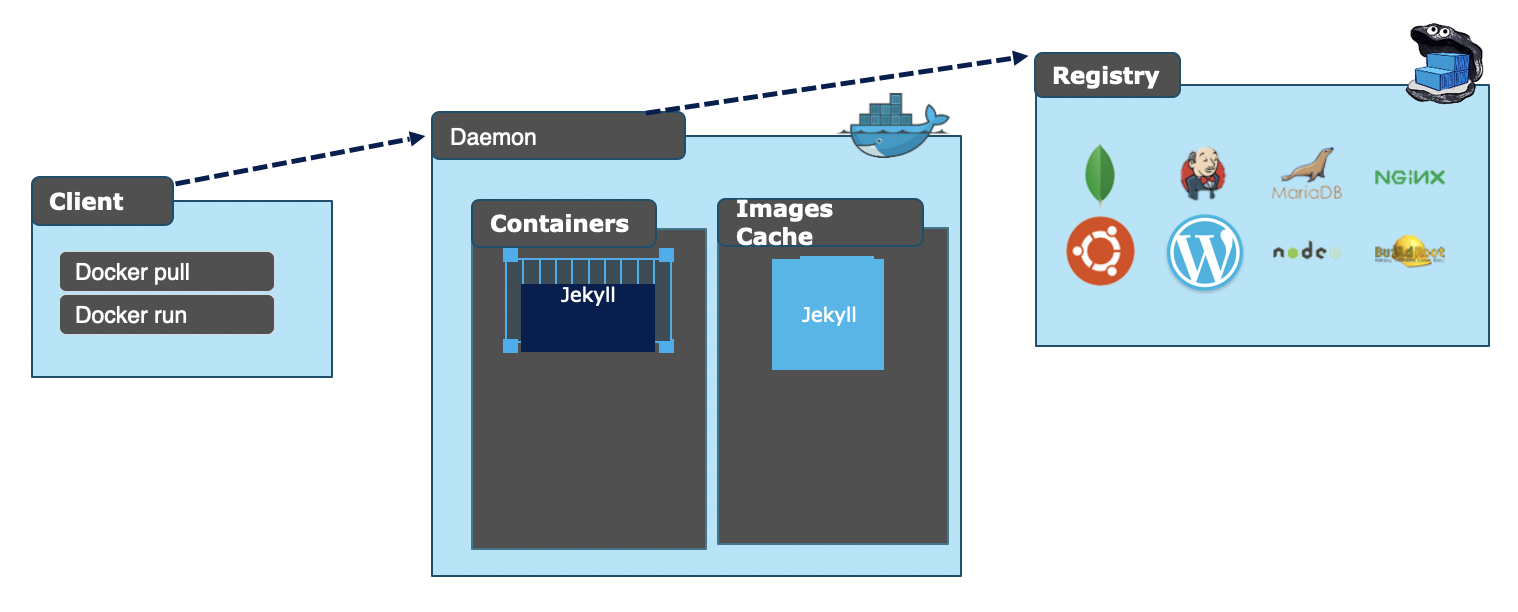
Docker is a container technology that is the de facto standard in the industry. Using any system, it is very easy to have Docker installed and running as a service in just a few minutes. The Docker ecosystem includes the following four components:
Image: is set of instructions necessary to create a container. It includes the application dependencies and specifies how to install and set up them.
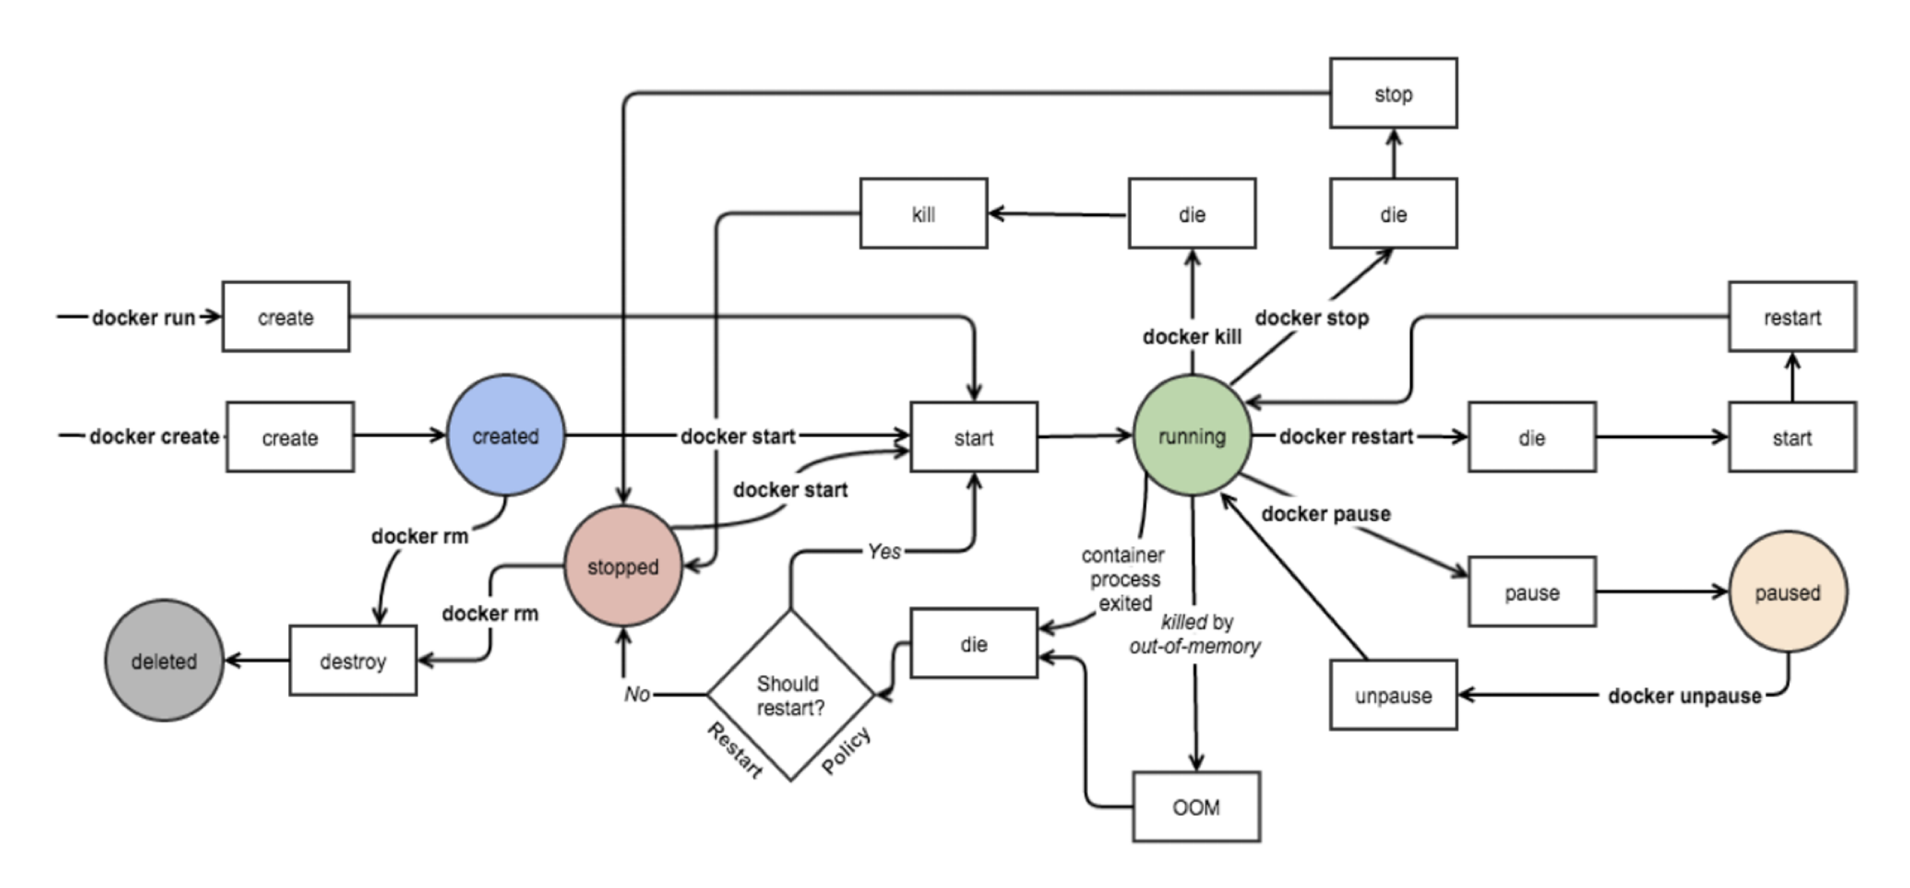
Container: is an instance of an image that has run, since it may be running, paused, or stopped at the moment.
Docker Engine: is a client-server application with a long-running daemon process acting as a server (dockerd), a command line interface (CLI) client and a set of APIs that can be used to interact with the the Docker daemon. Of course server and client can run on different hosts. The Docker Engine can be considered as an abstraction layer over the host OS and it is essential to run containers.
Docker Hub/Registry: is the place where images are stored and from where are distributed. The Docker Hub is public (currently includes around 5 petabytes of images), so companies usually have private trusted registries in their development environment where they publish/push images as a step of their build pipelines.
As an example, to run a container we could use the following commands in the Docker CLI:
- docker search image-name to search an image in the Docker Hub
- docker pull image-name to pull the image from the Docker Hub
- docker run image-name to run the container
Images and Dockerfile
The goal of containerization is to gather together all the components an application needs to run in a single, contained unit. Docker refers to that unit as a Docker image. Inside the image, there is the application the container is intended to execute and any libraries, configuration files, executables or other components that the application needs. So, an image is a static unit that is stored in a Docker Hub/Registry or in the local file system where the Docker engine is installed as a tarball.
Now the question is: how do we get such an image? An image is essentially built from the instructions used to get a complete and executable version of an application. This set of instructions is defined in a file called Dockerfile.
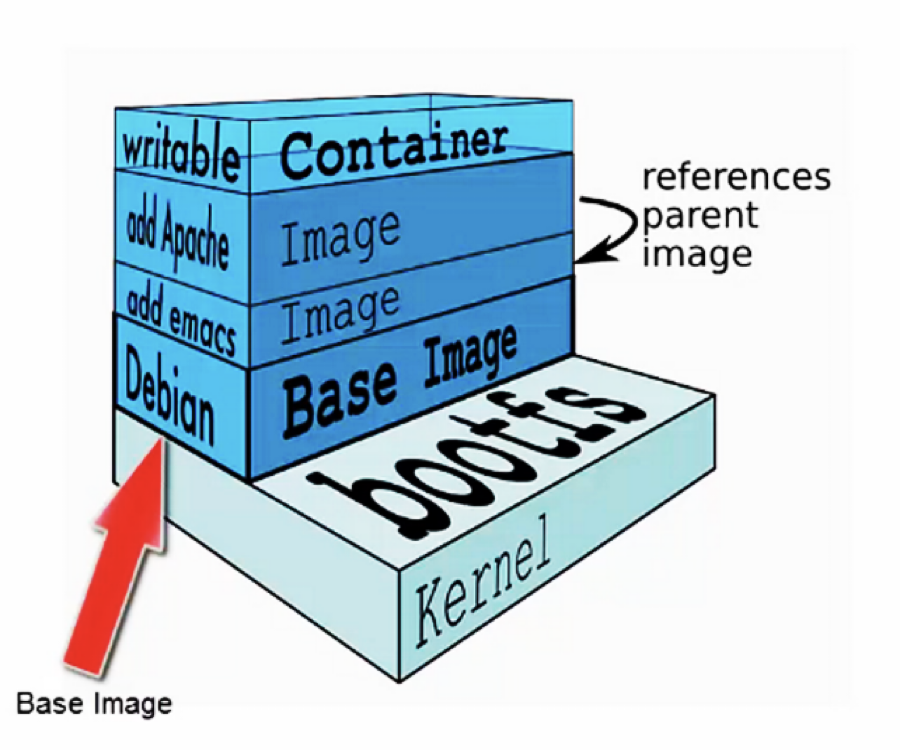
When we build a Dockerfile, the docker engine executes every single instruction creating an updated version of the image known as layer. In other words, a layer is an intermedaite version of an image and it is uniquely identified by an id (a digest). This concept of layers is particularly handy and enables a building time optimization called layer caching: if you make a change to your Dockerfile, docker will build only the layer that was changed and the ones after that.
So an image is a series of different layers with:
- a base image (usually a small part of the OS necessary to execute our container plus some basic dependencies)
- a series of read only intermediate layers (each one containing an additional dependency, a configuration step or something else necessary for the application)
- an upper writable layer called container (where we usually copy the output of the build of our application).
We can view all the layers that make up the image with the docker history command.
The main commands available inside a Dockerfile are:
FROM: specify the base image used as starting point (or the base OS used to host your system)
RUN: execute the subsequent commands creating a new layer on top of the previous one
ADD: copy new (local or remote) files into the image (for example the directory containing all the binaries after building our application)
ENTRYPOINT: program that is going to run as an executable (i.e. dotnet ourProgram.dll)
EXPOSE: Open container port to the outside
Missing: explain what is a multistage dockerfile (multiple FROM)
Naming and Tagging
When working with container images it becomes important to provide consistent versioning information, so that different image versions can be mantained and retrieved in the registries.
Image tags is the mechanism that provides us with the ability to tag container images properly at the time of building using the syntax docker build -t imagename:tag. If we don't provide a tag, Docker assumes that we meant latest and uses it as a default tag for the image. So latest is just the tag which is applied to an image by default which does not have a tag and it does not necessarily refer to the most recent image version.
It is not a good practice to make images without tagging them and it is important to follow a consistent nomenclature when using tagging to reflect versioning. This is critical because when we start developing and deploying containers into production, we may want to roll back to previous versions in a consistent manner. Not having a well-defined scheme for tagging will make it very difficult particularly when it comes to troubleshooting.
Windows vs Linux
Containers are natively part of the Linux ecosystem, taking advantage of the process isolation and the names spaces to create isolated processes. Neverthless Docker containers are available also for windows. Here the processes are managed in a similar way how are managed users but with a bit more isolation: each container sees its own file system and registry.
It is important to know that it is possible to run windows container only using a windows Docker engine and that when using such engine it necessary to specify if we want to run linux or windows containers. It is not possible to run together Linux and Windows containers.
Containers lifecycle
Docker containers can be started, stopped, paused, killed and they can also go out of memory. The difference between stop and kill is that in the first case the docker engine waits that the cointainer terminates normally, while in the second case it forces the container to terminate immediately. Usually in a production environment we only start the containers and let an orchestrator handle the containers lifecycle.
Docker Hub and Registries
A registry is a stateless, highly scalable server side application that stores Docker images and enables their distribution. It implements the Docker specification defining API to store and serve Docker images. Public Docker images are usually available on a server called Docker Hub, but of course we can also use private registries.
With private registries we can tightly control where our images are being stored, manage our images distribution pipeline and integrate image storage/distribution into our development workflow. Private registry provides also better security over public registry and can be geo-redundant making it faster to download/upload images based on client location.
Some popular private registry implementation are implementations:
- Docker private Hub
- Azure Container Registry (higly integrated with azure devops pipelines and default choice for windows containers)
- OpenShift
The main commands implemented by registries are docker login (login into a private registry providing username and password), docker push (push an image to the registry) and docker pull (pull an image from the registry).
Manage Data
Docker container images are meant to contain reusable applications, but all data saved inside a container doesn't persist when this is removed. This is a design choice whose aim is to keep Docker images small, since large images are not desirable for downloading even in local repositories.
So how does a container maintain data without committing the image each time there are changes to the data? The solution is to mount external storage. In this way the container image doesn’t change and all the state changes are persisted in a storage external to the container.
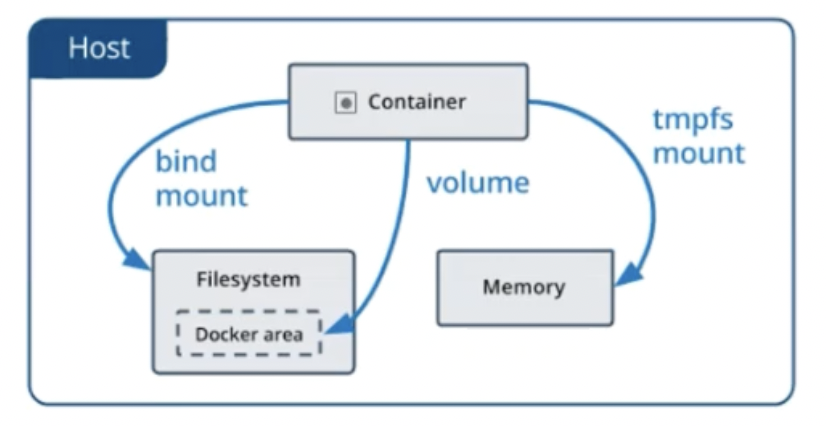
The following mounting options are available:
tmpfs: share files between the host machine and container so that we can persist data even after the container is stopped. Unlike the others mounting option, the tmpfs has several limitations: 1) the mount is temporary and data does not persist once the container is stopped; 2) data can't be shared between containers; 3) the mount is only available if we run Docker on Linux. The main use of this mounting option is to temporarily store sensitive files that we don’t need to persist in either the host or the container writable layer.
bind mount a file or directory on the host machine into a container, referencing it using the absolute path on the host machine. This mount is very performant, but relies on the host machine’s filesystem having a specific directory structure available. This mean a lower level of portability because if we later run the container on a different host there is no guarantee that the host will have the same directory structure. The main use case of this mount is sharing configuration files between the host and all the containers or sharing source code/build artifacts between the development environment on the host and the container.
volumes: mount a part of the host file system that is directly managed by Docker. This is the Docker native mounting option and is the preferred mechanism for persisting data generated by and used by Docker containers. They have several advantages over bind mounts: 1) easier to back up or migrate 2) volumes can be stored also on remote hosts or cloud providers 3) work on both Linux and Windows containers.
It is also important to know that Docker volumes are an extensible solution through plugins. For example it is possible to use plugins that extends the Docker volumes functionality enabling the mapping of volumes shared among multiple machines.
This is especially useful in case we need to configure multiple replicas of the same service. If we place the configuration data in a network file system, we can make it available to all the containers regardless the host where they are running.
Limit containers resources
By default, a container has no resource constraints and can use as much of a given resource (i.e. memory or CPU cycles) as the host’s kernel scheduler will allow. Docker can enforce two kind of limits on resources usage:
- hard limits, allowing the container to use no more than a given amount of a resource;
- soft limits, allowing the container to use as much of a resource as it needs unless certain conditions are met, such as when the kernel detects low memory or contention on the host machine.
We can limit the maximum amount of memory/cpu for a container using the -m option (the minimum limit is 4MB) and the maximum amount of CPUs with the option *–cpus=
Networking
If we want to run multi-containers applications, we need to have some networking. The Docker networking subsystem is extensible and we can introduce our own network driver if necessary. The following network drivers are typically available for Linux containers:
Bridge: is the default network driver and is the perfect solution for multiple containers to communicate with each other on the same host.
Host: remove the network isolation between containers and docker host, enabling the use of the host network directly.
Overlay: connect multiple Docker daemons on different hosts together so that containers running on these hosts can communicate with each other.
Macvlan: assign a MAC address to a container so that it will appear as a physical device on our network. This is the best choice when dealing with legacy applications that expect to be directly connected to the physical network instead of beeing routed through the docker host network stack.
None: it is used with a custom network driver.
Windows containers netwroking is a little bit different and support the following drivers:
NAT: containers receive an IP address from the user-specified (with the –subnet option) IP prefix. If no IP address is specified, the default 172.16.0.0/12 is used. It is always necessary to change the NAT internal IP prefix, if the host IP is in this same prefix. Container endpoints will be automatically attached to this default network and assigned an IP address from its internal prefix. Port forwarding and mapping from the container host to the container endpoints are supported.
Transparent: containers are directly connected to the physical network. IPs from the physical network can be assigned statically (with the –subnet option) or dynamically using an external DHCP server.
Overlay containers on a swarm cluster can communicate with other containers attached to the same network across multiple container hosts. Each overlay network that is created in a cluster has its own IP subnet, defined by a private IP prefix. The overlay network driver uses VXLAN encapsulation.
L2bridge: containers are in the same IP subnet as the container host. The IP addresses must be assigned statically from the same prefix as the container host. All container endpoints on the host will have the same MAC address due to Layer-2 address translation (MAC re-write).
L2tunnel: driver specific for Microsoft Cloud Stack.
We should choose the network driver which best suits our needs taking into account our physical network infrastructure and our networking requirements (i.e.single vs multi-host). In production environments, an orchestrator networking is often use in place of the native Docker networking.
Docker Compose
Docker compose is a tool that enables us to describe our applications as services within a YAML file (docker-compose.yml). In this context, a service really means a container in production. A service only runs one image, but it encodes the way that image runs: what ports it should use, how many replicas of the container image should run (so that the service has the capacity it needs), and so on. If we want to scale a service, we just increase the number of container instances running the application image in the YAML file, assigning more computing resources to that service.
Compose is particularly handy when working with multi-container applications, since it can guarantee that the containers discover each other in a seamless fashion. Let's consider a quite common scenario where a web application (acting as front-end) calls a backend RESTful web API to fetch some content. The web application needs to access the web API in a consistent fashion. In addition, the web application has a dependency on the web API and that dependency must be expressed when launching the applications in containers. All this is possible thanks to compose and the docker-compose.yml file.
Once the YAML file has been created, we can then use a single command to start and stop all the containers. Docker compose is extremely useful for development environments, automated testing environments and single host deployment. In production environments, orchestrators are usually used in place of compose.
Conclusion
I hope this article helped you understanding the concept of containers and get a general idea about the Docker platform. If you are interested in getting a deeper knowledge of the platform components introduced in this post, I strongly encourage you to go through the documentation available in the official Docker website. Stay tuned for a next post, where I will go through a series of exercises and tasks that will get you more familiar with Docker and the most frequently commands of the Docker CLI.
If you liked this post, follow me on Twitter to get more related content daily!